 National Radio
Astronomy Observatory
|
|
|||
| NRAO Home > CASA > CASA Cookbook and User Reference Manual |
|
||
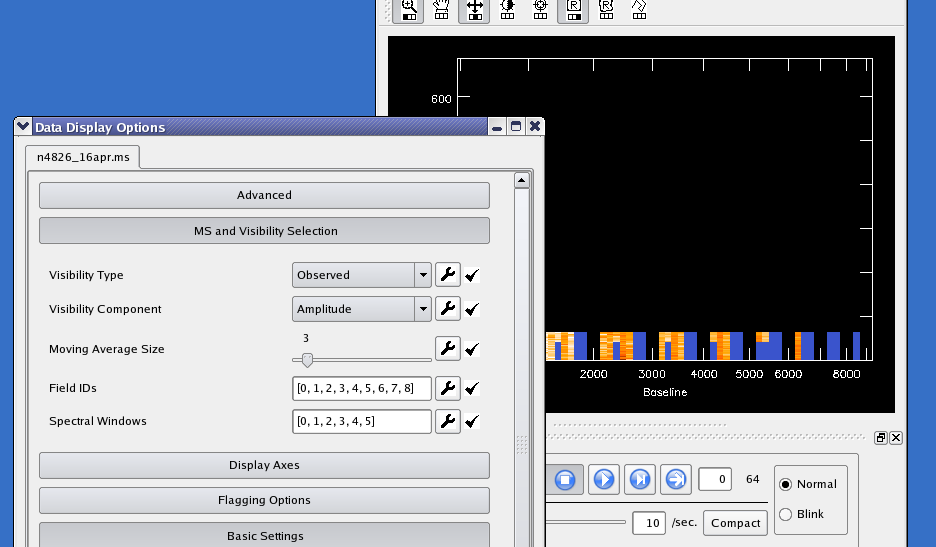
7.4.1.2 MS Options— MS and Visibility Selections
- Visibility Type
- Visibility Component
- Moving Average Size
This roll-up provides choice boxes for Visibility Type (Observed, Corrected, Model, Residual) and Component (Amplitude, Phase, Real, or Imaginary).
_________________________________________________________________________________________
Changes to Visibility Type or Component (changing from Phase to Amplitude, for example) require the data to be retrieved again from the disk into memory, which can be a lengthy process. When a large MS is first selected for viewing, the user must trigger this retrieval manually by pressing the Apply button (located below all the options), after selecting the data to be viewed (see Field IDs and Spectral Windows, below).
Tip: Changing visibility type between ’Observed’ and ’Corrected’ can also be used to assure that data and flags are reloaded from disk. You should do this if you’re using another flagging tool such as autoflag simultaneously, so that the viewer sees the other tool’s new edits and doesn’t overwrite them with obsolete flags. The Apply button alone won’t reload unless something within the viewer itself requires it; in the future, a button will be provided to reload flags from the disk unconditionally.
You can also choose to view the difference from a running mean or the local RMS deviation of either Phase or Amplitude. There is a slider for choosing the nominal number of time slots in the ’local neighborhood’ for these displays.
(Note: Insufficient Data is shown in the tracking area during these displays when there is no other unflagged data in the local neighborhood to compare to the point in question. The moving time windows will not extend across changes in either field ID or scan number boundaries, so you may see this message if your scan numbers change with every time stamp. An option will be added later to ignore scan boundaries).
- Field IDs
- Spectral Windows
You can retrieve and edit a selected portion of the MS data by entering the desired Spectral Window and Field ID numbers into these boxes. Important: Especially with large MSs, often the first thing you’ll want to do is to select spectral windows which all have the same number of channels and the same polarization setup. It also makes sense to edit only a few fields at a time. Doing this will also greatly reduce data retrieval times and memory requirements.
You can separate the ID numbers with spaces or commas; you do not need to enter enclosing brackets. Changes to either entry box will cause the selected MS data to be reloaded from disk.
If you select, say, spectral windows 7, 8, 23, and 24, the animator, slice position sliders, and axis labeling will show these as 0, 1, 2, and 3 (the ’slice positions’ or ’pixel coordinates’ of the chosen spectral windows). Looking at the position tracking display is the best way to avoid confusion in such cases. It will show something like: Sp Win 23 (s 2) when you are viewing spectral window 23 (plane 2 of the selected spectral windows).
Changes to MS selections will not be allowed until you have saved (or discarded) any previous edits you have made (see Flagging Options -- Save Edits, below). A warning is printed on the console (not the logger).
Initially, all fields and spectral windows are selected. To revert to this ’unselected’ state, choose ’Original’ under the wrench icons next to the entry boxes.
See Figure 7.20 for an example showing the use of the MS and Visibility Selections controls when viewing an MS.
More information about CASA may be found at the
CASA web page
Copyright © 2010 Associated Universities Inc., Washington, D.C.
This code is available under the terms of the GNU General Public Lincense
Home |
Contact Us |
Directories |
Site Map |
Help |
Privacy Policy |
Search