News News |
FAQ
|
| Search
|
Home
|
| Getting Started | Documentation | Glish | Learn More | Programming | Contact Us |
|
| Version 1.9 Build 1556 |
|


In the previous section we talked in general terms about tools and tool functions. Now we show some examples using the Glish command line.
Before you try to create a particular tool, you need to tell AIPS++ to load the commands that define the tool. For example, if you wish to create an Image tool, you need to first tell Glish about Image tools. Here are some examples of the most fundamental and useful tools in AIPS++.
% glish
- include 'table.g'                     # Access Table tools
- include 'quanta.g'                    # Access Quanta tools
- include 'measures.g'                  # Access Measures tools
- include 'image.g'                     # Access Image tools
- include 'pgplotter.g'                 # Access PgPlotter tools
- include 'catalog.g'                   # Access Catalog tools
- include 'imager.g'                    # Access Imager tools
- include 'ms.g'                        # Access MS tools
- include 'toolmanager.g'               # Access the toolmanager tool
You might ask why don't we just load all of those tool scripts so you do don't have to bother about it ? We can and we do. If you type
% aips++
that's exactly what will happen. However, it all takes time to load these scripts into the computers memory. It is often more effective for you to just load the commands relevant to the tool you wish to work with. When writing scripts, this always how we use the system.
In the examples below, we assume you have already loaded the appropriate scripts. All the ones you need are named in the examples above.
In general tools are made using their corresponding
constructors. Generally, a constructor goes by the
descriptive name of the tool.
imgr:= imager('filename of an MS')
include 'ms.g'
img := image('filename of an image')
The variable on the left-hand side can have any name you choose.
The catalog and toolmanager tools can also construct a tool from a table name and an appropriate constructor (that is chosen for you).
tm.tool('filename of an MS')
dc.tool('filename of an MS')
tm.tool('filename of an image')
dc.tool('filename of an image')
Some constructors create a tool after performing some
operation such as format conversion. For example, the
constructor fitstoms converts a
FITS data file to an MeasurementSet, and creates an
ms tool.
myms:=fitstoms('output MS file name', 'input FITS file name')
Other examples of these types of constructors are imagefromfits and imagefromarray.
Finally, Some constructors do not need an argument. Examples are
cattool:=catalog()         # create a Catalog tool
myplotter:= pgplotter()    # create a Pgplotter tool
The list of tools that are constructed and active are
displayed on the Tool Manager GUI in the Tools in Use
view. Once a tool is created, its various functions
which are meant for different operations can be used.
mytable:= table('3C273XC1.ms')
table is a general tool for operations on various types of AIPS++ Tables. This tool is not something that you may normally use in standard data processing but it can be very useful if you wish to do something out of the ordinary. The left-hand side of this expression, mytable, is the name of the Table tool you created. You can choose any name you like. The right-hand side is the constructor which takes a file name, in this case 3C273XC1.ms, as an argument and 'constructs' a tool. If you click Refresh in the Tool Manger GUI, the name of the newly constructed tool now appears in the list of Tools in Use. This tool is now specifically meant for operations on the MeasurementSet 3C273XC1.ms. You can create another Table tool (with a different name) for another MeasurementSet or some other AIPS++ Table.
The general syntax for using a tool function is
[output:=]tool.func(arg)
where tool is the name of the actual instance of the tool (e.g., (mytable), func is the name of the function (e.g., getcol), and arg are the arguments of the function. When no arguments are needed then the expression ends with (). The left-hand side is sometimes needed if the function produces an output which may have to go into a Glish variable.
Each tool may have several functions:
summary         # get a summary of the contents of the Table
colnames        # return the names of columns of the Table
getcol          # get values of a specific column in to a glish variable
getcoldesc      # get the description of a column
getkeywords     # get all the keywords of the Table
ncols           # return number of columns
nrows           # return number of rows
name            # return the name of the Table on the dis
Execution any of these functions to mytable is done
in the following way.
mytable.summary()   # watch the summary appear on the Logger window
mytable.colnames()  # column names appear on the Command Line window
a:= mytable.getcol('ANTENNA2') # column names now assigned to a
In the last example, the Glish array a now contains all the
values of the column ANTENNA2.
Note that the array size of a is equal to the number of rows, which
was automatically set by the Glish statement above. You can check
the shape of an array using the ::shape attribute.
a::shape
b:=mytable.getcol('UVW')
b::shape
You have just come across one of the important features of Glish,
namely automatic type assignment. The type of the variable (integer,
floating, scalar, vector) is assigned automatically as it is created;
therefore, you do not need to declare its type. There are many other
nice features in Glish which you can learn by reading the document
by Rick Fisher entitled
Getting Started with Glish.
mytable.close();		# If mytable still open
tabledelete('3C273XC1.ms')
Note that in creating the tool, mytable, you did not make any copy of the MS (i.e., the original Table) 3C273XC1.ms. By making a Table tool with the MS attached to it, you are able to gain access to various parts of the MS and use the functions of the Table tool to operate on them. This is the general way in which the various tools and tool functions are used in AIPS++. The above example is actually a special one, chosen for demonstrating access to the inside of an MS. One of the things you can do with an MS is create an Imager tool, which has various functions to make images and deconvolve them. You can also create a Calibrater tool with an MS that has functions for calibration of the UV data.
Below are some more examples of using tool functions from the Command Line
window. The commands below were not designed to try out in this session. They
are only examples.
myms.summary()                 # give the summary of myms
myms.range('TIME UVDIST')      # get the ranges of TIME and UVDIST
aa:=myms.range('TIME UVDIST'') # get the ranges into a record aa
The ranges are now available in the record aa as record members
aa.time, aa.uvdis.
myimgr.setimage(cellx='5arcsec', celly='5arcsec', nx=256, ny=256,
    stokes = 'I')
Note that other arguments of setimage such as doshift,
phasecenter take on default values. It is also possible to use
outputs of other functions as arguments where applicable.
imgr.setimage(phasecenter=
              image('myother.image').coordmeasures().direction)
imgr.setimage(phasecenter=
              dm.direction('j2000', '05h30m','-30.2deg'))
Before leaving the subject of tools, make one more
tool which is for a general utility and use some of its
functions.
include 'pgplotter.g'
myplotter:= pgplotter()
Note that this tool constructor can be used with no argument. It
brings up a pgplotter GUI like the one you saw before while
executing some functions earlier. The Tool Manager Tools in Use view
now includes myplotter.
The pgplotter GUI is shown in Figure 11. You can now use this plotter
to make any plot you want using the various functions of the
pgplotter
tool.
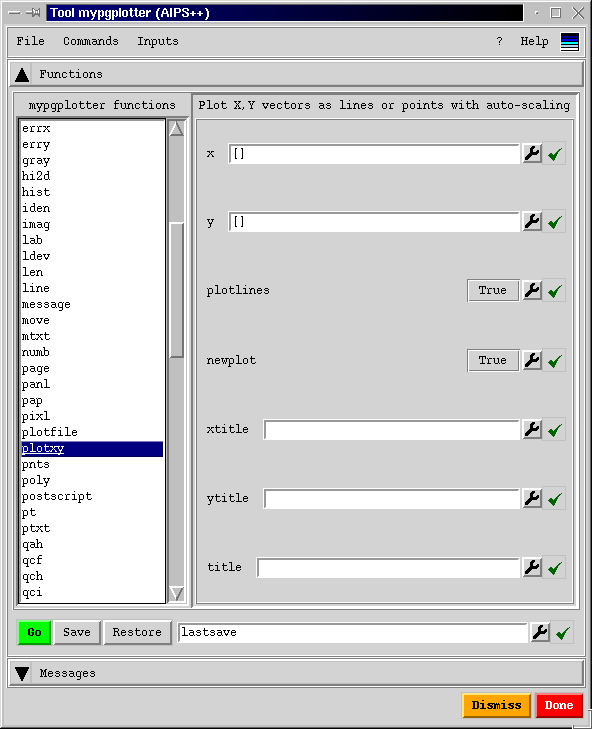
x:=1:10
y:=x*x
print x, y
myplotter.plotxy(x,y)
plotxy is one of the functions of the pgplotter
tool. For those of you who use PGPLOT a lot, you will be pleased to
know that the pgplotter tool allows you to do all the things you
can do with PGPLOT from the Command Line window, or through a
Glish script of the various PGPLOT-type commands, or through the
pgplotter GUI.
myplotter.lab('Xaxis label', 'Yaxis label', 'Top header')
myplotter.text(2,80,'Plot of X vs Y')
You can now dismiss the pgplotter GUI by clicking the Dismiss button.
Notice that the pgplotter GUI has options under the menu items File, Tools and Edit, These options allow you to save or print the plot, to add other items to the plot, to zoom. The pgplotter tool is useful for making your own plots or customizing plots that AIPS++ has made.
We discussed in the previous chapter how it is very important to destroy tools when you are finished with them. This is because they take up some computer resources (e.g. memory) and may lock data files. Let's see some examples now of how to do this with the done function, which every tool should have.
When you destroy a tool, it does not delete any disk-based data file that it may be associated with.
im1 := imagemaketestimage('zz')         # Create Image tool and write image into disk file 'zz'
im1.statistics()                        # Do statistics
im1.done()                              # Destroy tool
It is a very bad thing to overwrite a tool. You should never do this. It will leave resources un-freeable, leave data files locked and possibly cause AIPS++ to crash.
im2 := image('zz')                      # Create Image tool from disk file
im2.statistics()                        # Do statistics
im2 := imagemaketestimage()             # Overwrite tool; BAD BAD BAD BAD
im2.done()                              # Try to destroy tool; will not work correctly
To deal with this situation correctly, we should have done
im2 := image('zz')                      # Create Image tool from disk file
im2.statistics()                        # Do statistics
im2.done()                              # Destroy tool
im2 := imagemaketestimage()             # Construct a new tool (with the same name)
In all the examples discussed above, the functions which actually
do the job are attached to a tool. To use the function, the
tool to which it is attached need to be created first. As mentioned
earlier, there are some useful functions which are not attached
to any tool. These are known as global functions and they can be
activated at any point - usually from the Command Line window.
Although global functions may look different, they do belong to
the AIPS++ hierarchy in the sequence packages.modules.global functions.
Thus, the access to global functions through the Tool Manager GUI is
by clicking the appropriate package and module.
If the Run button below the column
global functions in the Tool Manager GUI is clicked, then it will,
in most case, open up a GUI from which the global function can be activated
similar to the tool functions described earlier.
cat             # list the files and Tables in the Catalog
icat            # list images in the Catalog
tablecopy       # make a copy of a Table
tabledelete     # delete a Table
mean            # compute the mean of a set of number
moments         # compute the moments of a set of numbers
gaussian2d      # compute a 2-dimensional gaussia
Using global functions is very similar to using tool
functions. The difference is that global functions do not
require a create operation before they can be used. These
functions are global to AIPS++ and they can be
entered at any point so long as the relevant packages or modules are
loaded using the include command. Some global
functions have optional arguments and produce output records, plots,
or GUIs. Currently, most global functions can be used
from the Tool Manager window.
include 'statistics.g'          # load the statistics functions
mean(1:100)                     # mean of numbers 1 to 100
x:=[1,3,7,8:15,19,23]           # vector assignment
mean(x)                         # mean of x
note('This is a note in the Logger file')	# Note to the logger
help('moments')                 # help on moments
web()                           # Drive the Web Browser to
                                # the last requested help
moments(3,1:20)                 # compute up to 3rd moment of
                                  numbers 1 to 20
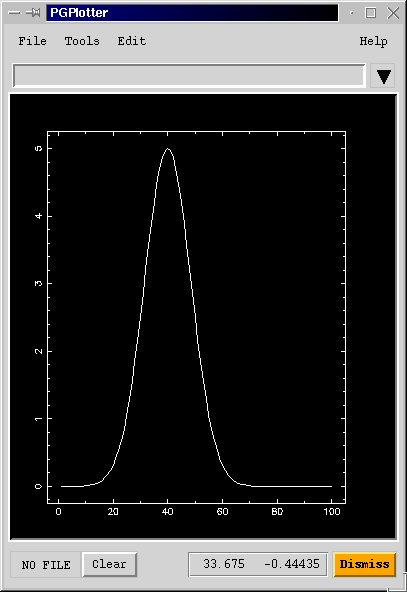
include 'gaussian.g'
x:=1:100
y:=gaussian1d(x, height=5, center=40, fwhm=20)
include 'pgplotter.g'
mypgplotter:=pgplotter();
mypgplotter.gui()
mypgplotter.plotxy(x,y)
The plot, as shown in Figure 12, appears on your screen.