
| Version 1.8 Build 235
|
|


Next: 7. Reducing JCMT data in DISH
Up: Volume 3 - Telescope Specific Processing
Previous: 5. ATCA reduction
Subsections
6. Parkes Multibeam Reduction
Stacy Mader
This chapter describes how to use AIPS++ in reducing Multibeam data
from the ATNF's Parkes Radiotelescope. Data reduction is controlled via
the graphical user interfaces (GUIs) Livedata, Gridzilla and Cubecat.
The source code for AIPS++ is available (at the ATNF) in the directory /nfs/aips++/stable.
To setup paths for glish libraries, etc., perform the following:
% source /nfs/aips++/stable/aipsinit.csh (for csh/tcsh shells)
% . /nfs/aips++/stable/aipsinit.sh       (for korn/bash shells)
Livedata is the on-line and off-line processing software for data taken with the
Parkes multibeam receiver, though has the capability of processing data from
other telescopes. The principal task of Livedata is to remove the
bandpass which is the dominant component of every raw spectrum.
Livedata also calibrates the spectra,
applies doppler tracking, smoothes and baselines the spectra, and has
an excellent capability for visualising calibrated spectra.
To startup Livedata, type:
% livedata   ..or..
% glish -l livedata.g
Figure 6.1:
The Livedata GUI with all clients enabled.
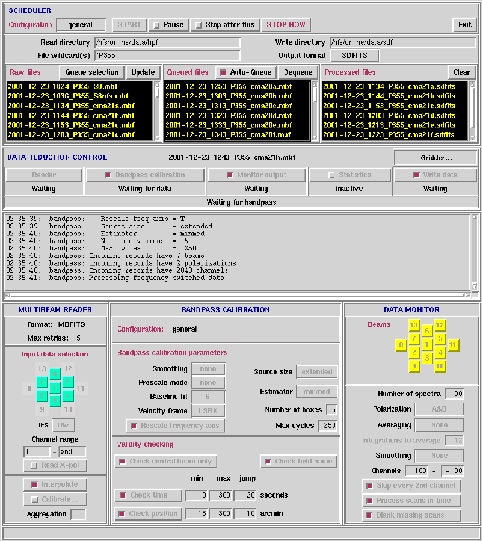 |
Livedata directs and regulates the data flow between the following seven
clients:
Scheduler
       -> Reader
              -> Bandpass calibrator
                                  -> Monitor
                                  -> Statistics
                                  -> Writer
                                             -> Gridder
The flow of data is from left to right. All clients other than the
reader may be disabled or short-circuited, i.e. any line(s) of the
above may be bypassed other than the first. When selected, each
client has a control panel on the Livedata GUI. By default, only
the reader client is enabled at startup. A detailed description of
each client and input arguements (via the GUI) are made below.
Figure 6.2 shows the Scheduler, which provides
for realtime (live) and off-line data reduction. Realtime reduction
differs from off-line reduction in that files newly created
by the correlator may be discovered automatically (auto-queued) and
that several attempts are made to read files which may be incomplete.
- Configuration: general, HIPASS, HVC, ZOA
- Read Directory: Input file directory (default $MB_HPF_SOURCE_DIR).
- File wildcard(s): Wildcard specification(s) for input files.
- Write Directory Output file directory (default uses $MB_MSCAL_DESTINATION_DIR).
- Output format: `SDFITS' (recommended) or `MS2'.
- Auto-Queue: Automatically check for new files which may
appear in the input directory and add them to the processing queue. When
the end of a data file is reached, LiveData will wait for new data to be
appended.
Figure 6.2:
The Scheduler panel.
 |
This client reads data from sdfits (usually .sdfits) or rpfits (usually
.rpf .mbf or .hpf) files or
an AIPS++ Measurement Set (.ms2cal). The input data, which may be selected on
a beam-by-beam basis, is packaged as a Glish record for the next client
in the chain. The Reader client is enabled by default whereas the others
(see below) are disabled.
- Input data selection: Mask of beams selected subject to their
presence in the data.
- IFs: select IF's to read 1&2, 1, or 2.
- Channel range: Start/End spectral channel;
zero or negative value specifies an offset from the
last channel, can also be specified as 'end' or 'last'.
Spectral inversion may be achieved by setting endChan
< startChan.
- Read X-pol: Read cross-correlation data
in addition to auto-correlation data. There is presently
no option to process or write out cross-correlation data.
- Interpolate: When telescope is scanning, apply
position interpolation when position and data timestamps are not aligned
(rpfits format only).
- Calibrate: Apply flux calibration? Once
selected, a panel will appear as shown in Figure
6.4. For each beam and
polarization, you can enter and apply calibration
scale factors to auto-correlation or cross-polarization
data. Set to zero to use values stored in raw data
headers. For each modified beam and/or polarization factor,
Tsys,
 and the spectrum are multiplied by the
entered factor. For non-zero values, values present in the
raw data header are divided by themseleves and then multiplied
by the new calibration factors. Options are provided to
load/save a calibration file.
- Aggregation: Number of scans to aggregate
in one Glish record (for efficiency).
Figure 6.3:
The Reader panel.
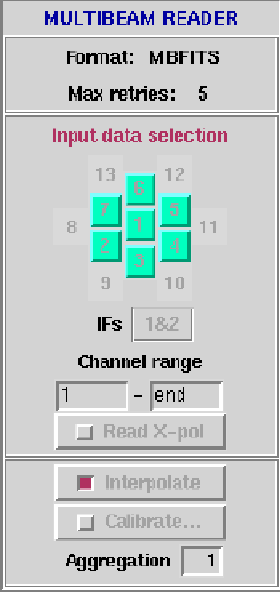 |
Figure 6.4:
The Reader calibration panel.
 |
This client does most of the work in calibrating Multibeam
data. It operates in several modes depending on the method
of observation:
- Scanning mode: as used in HIPASS and ZOA surveys.
- Frequency switching mode.
- Position switching mode: where each beam of the
Multibeam receiver is pointed at the source in turn.
- Extended source modes such as used for High Velocity Clouds.
Each of these modes uses a separate bandpass calibration
strategy. These are based on robust statistical estimators,
particularly median estimators, which allow rejection of
RFI without human intervention.
- Bandpass calibration parameters:
- Smoothing function: 'Tukey', 'Hanning' or 'none'.
- Prescale mode: Method of prescaling
spectra before averaging, 'none', 'mean', or 'median'.
- Baseline fit: Method of post-bandpass residual
spectral baseline removal:
- -1: for no post-bandpass fit,
- 0: for constant offset (i.e. median),
- 1: for robust linear fit,
- >1: for robust (iterative) polynomial fit.
- Velocity frame: Shift spectra to this
velocity frame: 'BARY', 'LSRK', 'LSRD', 'LSR', 'GEO',
'TOPO', or 'GALACTO'.
- Rescale frequency axis: The Doppler shift
may be applied in either of two ways:
- T: predominantly by scaling the frequency
axis parameters but also by shifting the
spectrum (via FFT) by a fraction of a
channel so that the new reference
frequency is an integer multiple of the
original channel spacing. This method is
more accurate and satisfies gridzilla's
requirements, for which it must be used
if Doppler tracking was enabled when the
observations were made.
- F: by shifting the spectrum (via an FFT)
without changing the frequency axis
parameters (the HIPASS/ZOA method).
- Source size: Source extent, determines extent of baseline
for bandpass estimation, 'compact' or 'extended'.
- Estimator: Statistical estimator used for averaging spectra:
- median: Median of whole scan.
- mean: Mean of whole scan.
- minimum: Minimum of whole scan.
- minmed: Minimum of the medians of a number of sub-scans.
- medmin: Median of the minima of a number of sub-scans.
- none:
- Bandpass interval: The period, in cycles, at which the
bandpass is recalculated.
- Number of precycles/postcycles: to store in the buffer
and search for valid bandpass spectra.
- Validity checking:
- Check central beam only: For faster processing only do checking
(see below) on the central beam.
- Check field name: Check that the field name hasn't changed
between successive integrations?
- Check time: min/max/jump; these parameters
define the allowable time offset between the integration being
calibrated and those used for bandpass estimation. Default
values for min, max and jump are 0, 300 and 20 seconds respectively.
- Check position: min/max/jump;
these parameters define the allowable position offset between
the integration being calibrated and those used for bandpass
estimation. Default values for max, min and jump are 15, 300
and 10 arcmin respectively.
Regarding the number of pre- and postcycles, the buffer must
be large enough to contain the current scan, the previous and
following scans, plus the first integration of the scan after
the following scan. For example, if scan 2 is being processed,
the buffer must contain all of scans 1, 2, and 3 plus the first
integration of 4, the presence of which told us that scan 3 had
finished. The reference spectrum for 2 is computed once when
the first integration of scan 4 is read, and the first integration
of scan 2 is then written out. This space is then available for
the second integration of scan 4; each successive integration of
scan 4 may overwrite the integration of scan 2 which has just
been sent out.
In cases where the buffer size (precycles + postcycles + 1)
is insufficient (usually in the MX, or beam-switching mode),
a warning is issued stating both pre- and postcycles
should be increased by at least the present value of
(precycles + postcycles + 1) plus an overrun value which is
stated in the log message. Generally, the pre- and postcycle
values can be calculated by: 3*nint, where nint is the
number of integrations specified during observering. By not
incrementing the values of the pre- and postcycle, the signal
to noise ratio of the reference spectrum becomes degraded.
For the HIPASS, HVC and ZOA options, the pre- and postcycle
values are set to 24, which implies a maximum of (24+24+1=49)
scans are held in the buffer.
Figure 6.5:
The Bandpass Calibration panel.
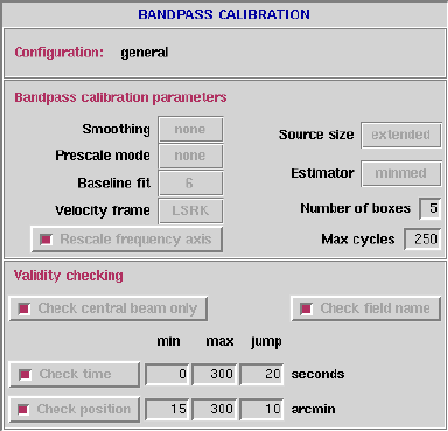 |
Figure 6.6:
The Data Monitor panel.
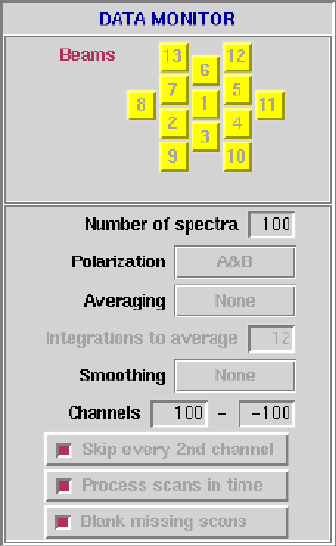 |
The data monitor interfaces to MultibeamView, a
specially modified version of the Karma package ``kview''.
In fact, it invokes MultibeamView twice, once for each
polarization, to provide two panels displaying frequency
versus time with various image enhancement options. This
provides visual inspection for each pair of polarizations
of each beam, one pair at a time as data arrives. An example
("waterfall") panel is shown in Figure 6.7.
It is anticipated that MultibeamVIew will be replace by
a native AIPS++ imaging tool in the near future.
- Beams: Mask of beams present in data.
- Number of spectra: Number of spectra to display.
- Polarization: A&B, A only, B only, or A-B.
- Averaging: Time averaging method:
- None ...no averaging.
- Mean, Median, Maximum or RMS calculate the relevant
statistic for each channel over N integrations; one spectrum
is displayed for every N integrations.
- Data-median subtracts the median value for
each channel computed over N integrations;
the number of spectra displayed is unaffected.
- Integrations to average: Number of 5 second scans to use in
time averaging. Ignored for timemode "None".
- Frequency smoothing: None or Hanning.
- Channels: Start/End spectral channel: zero or negative value
specifies an offset from the last channel, can also be specified as
'end' or 'last'.
- Skip every 2nd channel: If true, skip every second channel of
input spectra.
- Process scans in time: If true, process scans in time (i.e.
output frames have a time axis).
- Blank missing scans: If true and "process scans in time" is
false, missing scans are not blanked, else missing scans are always
blanked.
- Intensity: After some data has appeared on the plots, set the
displayed intensity range for each waterfall by selecting
IScale for Dataset 2 from the Intensity menu.
This will bring up the Intensity Zoom window, and show a histogram
of intensity values. Select the intensity range by clicking on the histogram,
using the left mouse button for the lowest intensity and the right button
for the highest intensity (or you can click on the 95
Close makes the changes as well as closing the window.
- Display Colour: Choose a colour map by selecting
Pseudocolour (8 bit) from the Intensity menu. The
pseudoCmapwinpopup window displaying a list of colour
maps on the RH side will appear. Choose a colour map. Move the dot
around in the LH field to change the contrast and darkness.
- Resizing: Next, you will have to resize the window so you
can get as much of the data on the window as possible. Under the Zoom menu,
select the Zoom Policy option. The zoomPolicyPopup window
displaying several options will be presented, but all you have to do is
deselect the Integer X Zoom and Integer Y Zoom boxes. Now click on
Close to exit the window. The data should now fill a larger part of
the waterfall display. Do this for the other polarisation window.
- Axis Labels: To display the Frequency (X Axis) and Time (Y Axis)
annotations, click on Overlays, select the Axis Labels option and
the dressingControlPopup window will appear. Select the
Display Axis Labels box and Close the window. The waterfall should
now display Frequency vs Time. Do this for the other polarisation as well.
- Select Different Beams: To display different beam outputs,
click on the View button which will bring up the View Control
window. Now click on the Movie button where you will be presented
wit the Animation Control window with buttons like Previous Frame
and Next Frame. By clicking on one of these two buttons, the waterfall
display will show the appropriate beam (as defined next to the
Number of frames: line. Similarly, if you move the mouse cursor onto
the waterfall display, the currently selected beam is shown in the top
RH corner. Click on the Close to dismiss the View and Animation
Control windows after you are finished.
To obtain a 1-dimensional spectral profile:
- Click the View button.
- Change profile axis: y to profile axis: x.
- Select line from the profile mode menu.
The profile changes according to the position of mouse cursor on the
XZ (Frequency-Time) image. To Zoom a profile:
- Use the spacebar to freeze the profile you want to zoom.
- Click and drag in the profile window according to the area
you want zoomed.
- Back in the main Livedata window, use the spacebar to
unfreeze the profile frame.
- Use the Unzoom button in the profile window to unzoom.
Axis labels can also be added.
The statistics client reads through an AIPS++ Measurement Set and computes basic statistical measures for each
beam and polarization.
- Type: The statistic to be plotted: Tsys, mean, median
rms, quartile, minima, maxima.
- Pols: Polarizations selected for plotting: 1, 2, 1&2, 1+2, 1-2.
- Beams: Beams selected for plotting.
- Save: Save the current plot.
Data is written to an AIPS++ Measurement Set by
the writer client. These measurementsets are converted to
either SDFITS or MS2 format.
Each Multibeam integration consists of a spectrum taken at
a particular point on the sky. The gridder (gridzilla) takes
the spectra from a collection of bandpass-calibrated
measurementsets and writes a 3-plane cube with the total
number of spectra or scans per pixel in the first plane, the
number of these occurring at nighttime in the second
plane, and the number during daytime the third plane.
Figure 6.7:
A MultibeamView panel
displaying frequency vs time for beam 9, Polarization A.
A faint galaxy can be seen near 1415 MHz at 08h46m.
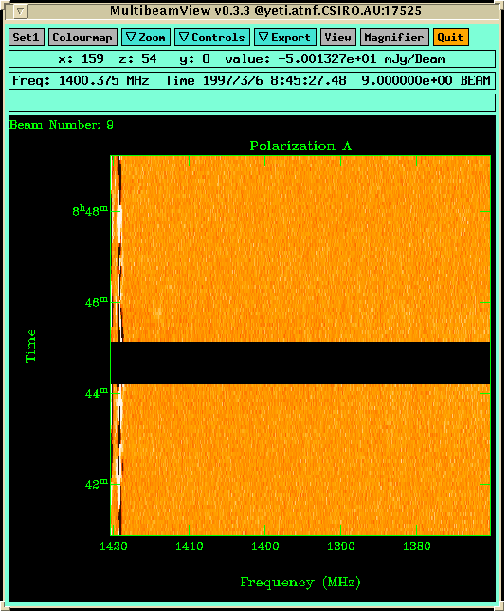 |
Figure 6.8:
The Statistics window displaying
Tsys for 7 beams.
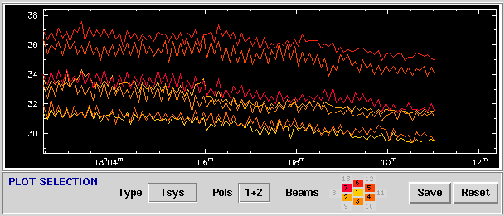 |
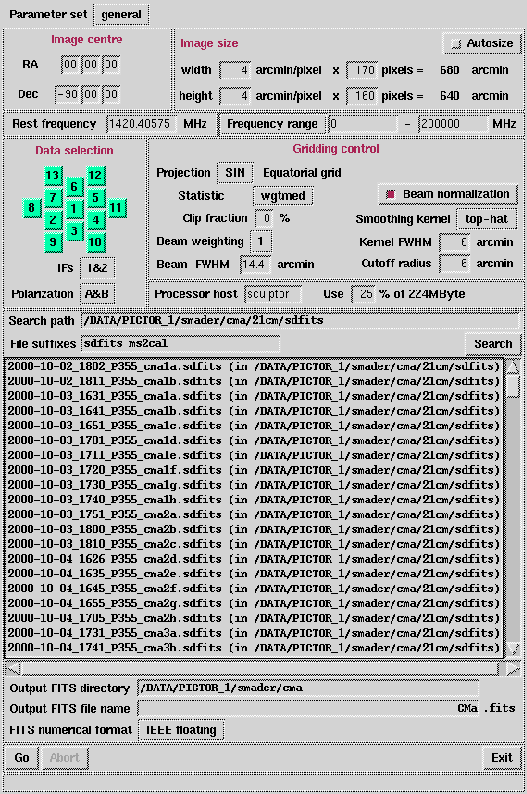
Figure 6.9:
The default Gridzilla GUI.
 |
Typically each point in the sky is sampled many times in
separate observations and the gridder combines these using
robust statistics to automatically eliminate RFI. Being the most
computationally intensive client, the gridder is usually
used separately for off-line data reduction, but by pressing
the Gridder button on the Livedata GUI, SDFITS files
are transferred straight to the gridder. In this section,
we assume reduction is off-line. To start up gridzilla:
% glish -l gridzillarc.g
Both the gridzilla (Figure 6.9) and logger
windows appear. The GUI contains several panels and entry
widgets, each which is described below.
- Parameter set: Options are general,
HIPASS, HVC and ZOA. All except the
general option has field centres on a fixed grid.
For options HIPASS, HVC and ZOA, the gridder runs one
of the various 'coverage' scripts to determine the files
required for the standard HIPASS, HVC or ZOA cubes.
Each script is passsed several arguments according
to the survey and field centre selected. An example is
given below.
- Image centre and size: It is possible to manually
input the center coordinates of
a region to be gridded and the pixel resolution of the output
FITS cube(s). If the Autosize widget is selected,
the Image centre panel disappears and gridzilla
automatically determines the image center from the input
data. For HIPASS, HVC and ZOA options, the field centres lie on a
fixed grid and if selected, both panels are set to default
values. For example, if the ZOA option is selected, the Image
centre panel displays a menu widget showing ZOA galactic longitudes
and the Image size panel shows the output image size (width/height)
defaulting to 4 arcmin/pixel.
- Rest frequency and Frequency/Velocity range:
You can input the line Rest frequency, in MHz.
The start/end spectral range can be set to either Frequency
(MHz) or Velocity (km s-1). By changing from
velocity to frequency or vice-versa, the conversion is
calculated and displayed.
- Data selection:
- Input beams: You can select/deselect input
for each beam. If a beam is deselected, its number is grayed out.
- IFs: 1&2, 1, or 2.
- Polarization: A&B, A only, B only, A+B, or A-B.
- Gridding control:
- Projection: Output map projection
(equatorial grid): SIN, NCP.
- Statistic: Statistical estimator, 'wgtmed',
'median', 'mean', 'rms', or 'quartile'. 'wgtmed'
is the weighted median of the values as opposed to
'median' which is the median of the weighted
values. Quartile is wgtmed{
| X - wgtmed (X)|}
and measures the inter-quartile range of the pixel values.
- Clip fraction: Percentage of data to
discard in the smoothing operation.
- Beam weighting: Beam weighting is
based on the beam response calculated for the
distance of each spectrum from the pixel.
- 0: No beam weighting.
- 1: Weight spectra by beam response.
- 2: Weight spectra by square of beam response.
- Beam FWHM: FWHM in arcmin of the smoothing kernel.
- Beam normalization: Apply beam normalization?
- Smoothing kernel: top-hat or gaussian.
- Cutoff radius: The smoothing cutoff radius
should always be 6 arcmin for HIPASS, HVC and ZOA cubes.
- Processor host: You have the option to select the
host on which to run gridzilla. The default is to run the
client on the startup host. You can also enter a percentage
of the processor memory to make available to the gridder client.
- Search path: Directory search path for data
files. Default is to search
for files with suffuxes (see next item) in the '.', '..'
and '/DATA/MULTI_1/mscal' directories. Any matches are
listed. Any number of valid directories can be entered,
seperated by a colon (':').
- File suffixes: List files with defined suffixes.
Default is to list 'sdfits' and 'mscal' files in paths defined at
Search path. If additional files are added
to Search path, the Search button can
be used to update the input file list.
- Output FITS directory: Output FITS directory.
Default uses PATH.
- Output FITS name: Output FITS file name.
The extension is automatically
set to 'fits'. If a file with the current file name
exists, it will be overwritten. Default file name is
'gridzilla'. The client determines the size of the
gridding problem and the number of passes required
to stay within the memory limits. If the entire
problem can be completed within one pass, the
output file name will just be 'gridzilla.fits'.
However, if the problem cannot fit within a single
pass, the cube is output into multiple FITS files
with '_001.fits', '_002.fits', ... , '_00n.fits'
appended to the entered file name.
- FITS numerical format: Small means 16-bit
FITS integer on scale -8 to 32 Jy, else IEEE floating.
Although each standard HIPASS, ZOA and HVC cube is created
by respective team members, those who wish to create new
cubes (using different livedata processing options) can
do so by reading on.
During the data taking process at Parkes, each scan is archived
onto CDROMs as a raw (HPF) and processed (SDFITS) file. For each
CDROM, there is a size file which lists files archived onto it.
In order to identify which scans are located on which CDROM(s),
a 'coverage' script is available which allows you to pass
parameters enabling you to list the required CDROMs to extract
scans from. The HIPASS script is 'coverage.pl' and for the HVC
and ZOA surveys, they are 'coverage-hvc.pl' and 'coverage-zoa.pl'
respectively. For ATNF sites, these scripts are located
in /nfs/atapplic/multibeam/bin and each requires the
$MB_CATALOG_PATH environment variable to be set where the
size files are located:
For csh/tcsh shells:
% setenv MB_CATALOG_PATH '/nfs/atapplic/multibeam/archive'

For sh/bash shells:
% set MB_CATALOG_PATH '/nfs/atapplic/multibeam/archive'
Say you wanted to create the standard HIPASS cube H035.
To identify which scans are on which CDROMs, the coverage
script has the following parameters:
# t = file type: "SDF" or "HPF"
# c = cube number (overrides d,s,e)
# d = declination band
# s = start sequence
# e = end sequence
# m = scan letters required (eg "abcde")
# a = auto recurse in read dir eg. for CDs.
# r = read dir
# w = write dir
# x = read ext
# y = write ext
# q = quiet (0,1,2)
# b = (anything) means include bad scans - USE WITH CAUTION!
The following command will list all SDF (processed) CDROMs you
need to make cube H035:
coverage.pl -t SDF -c 035
The script goes through all size files and lists the required CDROMs,
which in this case, are 68, 71, 156, 157, 160, 161, 166, 196, 280, 296,
360, 408 and 416. You can then configure the coverage script to
automatically copy the required files from each loaded CDROM to
disk by creating a shell script containing the following:
#wait for CDROM to mount:
sleep 10
#now identify scans in cube H035 and copy to disk:
coverage.pl -t SDF \
            -c 035 \
            -r /cdrom/cdrom0 \
            -w /path/to/diskspace \
            -x sdfits \
            -y sdfits \
            -a 0 \
#eject and load another CDROM if required
eject cdrom
Once all scans have been copied from CDROM to disk and assuming
you have entered the correct path(s) to the SDFITS files in the
Search path entry box of the gridzilla GUI, selecting
the HIPASS option at the Parameter set widget brings up
the list of standard cubes. Each shows central coordinates and
cube name as in Figure 6.10. The central
position of cube H035 is shown as 1211-66 (12h 11m 00s,
-66d 00m 00s J2000).
Gridzilla invokes the coverage script again and goes through all
size files. After the script finishes, the log window lists all
scans required to make up the cube and also if each scan was
found in the search path(s). In this example we see that out
of all the 'abcde' scans in the cube, only the 'a' scans where
found. For this reason, the output FITS file name becomes
'H035_a.fits' instead of H035.fits (which indicates all
SDFITS files were found). At this stage you can create the
partial cube or load more scans with the coverage shell script.
Once you select all scans and press the Go button,
the gridzilla log window lists parameters of the
output cube such as velocity/frequency range and central
pixel coordinates. Depending on the amount of available memory,
gridzilla may combine all scans into a single cube, but if not,
several "cubelets" will be made. You can concatenate them
with Cubecat (see below).
Figure 6.10:
Using gridzilla to construct
the HIPASS cube H035.
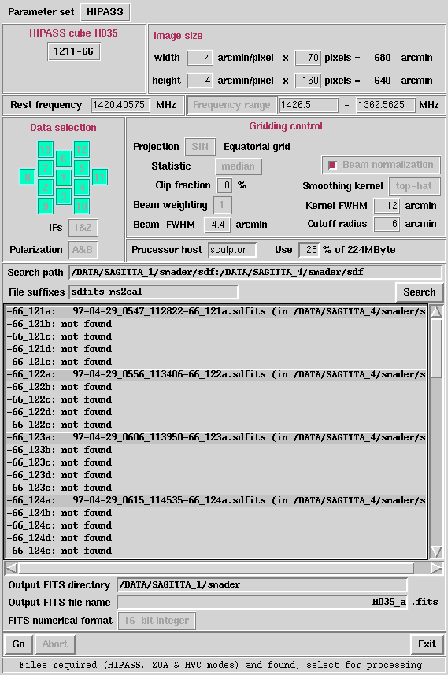 |
Figure 6.11:
The default cubecat GUI.
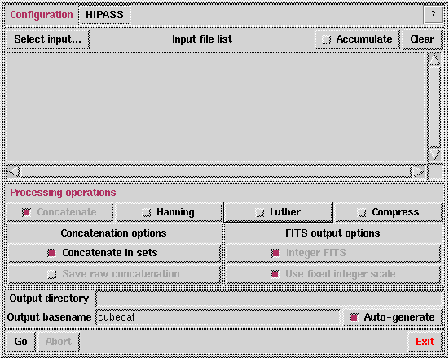 |
Due to memory allocation, gridzilla may not create a single cube.
If gridzilla outputs may cubelets, you can concatentate
them together with cubecat. Cubecat also allows for post-processing
options such as continuum source ripple removal. To start up cubecat:
% glish -l cubecat.g
The default GUI is displayed in Figure 6.11.
Cubecat is self-documenting. For information on what a particular
widget does, simply place the mouse cursor on the widget
for an explaination. A more detailed description is available
by pressing the right-most button on the mouse whilst over
the widget. The type and amount of detail available can be
altered via the "?" widget located at the top RH corner
of the main GUI.
- Configuration: general, HIPASS, HVC or ZOA
- Select input: Brings up a seperate GUI
to allow you to enter the directory where your input
cubes are located. There is an option Stay up
which keeps the GUI visible. Under the Options
list, you can list files alphabetically, time modified
and access time. Other options are listed.
- Accumulate: If true, add additional files to the input
list, otherwise overwrite it.
- Processing operations:
- Concatenate: If true, concatenate all files in the input list.
Other options include:
- Concatenate in sets: If true, the input list will be
split into multiple concatenation sets based on the first
four letters of the input file name.
- Save raw concatenation: If true, and concatenation and
smoothing and/or luther are selected, then save the raw concatenated
file.
- Hanning: If true, Hanning smooth the output. Hanning
smoothing is performed on the 3rd spectral axis of the output cube.
- Luther: If true, run luther on the FITS file.
In the vicinity of bright continuum sources, there is a
gradual rise in flux towards the high-velocity end of the
bandpass. As a result, bandpass removal within livedata is
over-estimated such that there are negative baselines for
low-velocities and positive baselines for high velocities.
The LUTHER algorithm makes a polynomial fit to continuum
sources in a data cube and then subtracts this fit from
each of the spectra in the gridded cube. More details
of the LUTHER algorithm can be found in Barnes et al.
(2001), MNRAS, 322, 486-498.
- Compress: If true, compress the output FITS file
using gzip. Other FITS output options include:
- Integer FITS: If true, write 16-bit integer FITS data format
(with range -8 to +32 Jy) instead of 32-bit IEEE floating. Integer
format output is half the size and is also amenable to compression.
- Used fixed integer scale. If true, set the FITS integer
scale to -8 to +32 Jy. Otherwise the scale is adjusted to encompass
the minimum and maximum values.
- Output directory: Output directory. Default uses PATH.
- Output basename: Output file name; used only if there is one
input file or there are several to be concatenated.
- Auto-generate: If true, generate an output file name based on
the (first) input cube filename and processing options. For example,
if the Hanning option is selected, '-hanning' is appended to the
filename.


Next: 7. Reducing JCMT data in DISH
Up: Volume 3 - Telescope Specific Processing
Previous: 5. ATCA reduction
Contents

 News
News  FAQ
FAQ
 Search
 Home
Home

