News News |
FAQ
|
| Search
|
Home
|
| Getting Started | Documentation | Glish | Learn More | Programming | Contact Us |
|
| Version 1.9 Build 1488 |
|


Tim Cornwell
This chapter provides an overview of how to process tabular data with standard tools and Glish capabilities.
The major modules and tools that are required are:
The User Reference Manual contains the primary documentation for all these tools and their functions. The aim of this document is to provide pointers to the relevant chapters and examples.
Most data in AIPS++ are stored in tables. A table consists of an unlimited number of columns of data, with optional column keywords and optional table keywords. See the table module documentation for details.
There are different flavours of tables, e.g. Measurement Sets holding visibilities, Images, calibration tables and so on. The flavour difference simply means that these tables have (different) specific required entries and there are high-level tools which understand these differences. But fundamentally, all these tables use the same underlying data structure, which can be accessed via a generic Table tool. A Table tool provides you with direct access to a table, no matter what flavour it is. You can recover, manipulate and display the data with it.
As well as using a Table tool, one can also manipulate tabular information (however it is stored) with Glish itself. Examples are given below.
You have a number of options for reading your data into AIPS++.
Reading into a table is often the best route either if you have lots of data or you want to do things like selections and queries on the table. Reading directly into Glish variables is adequate otherwise, and is more convenient if the data needs some preprocessing.
To write information out in an ASCII file, the basic route is to use the table.toascii function.
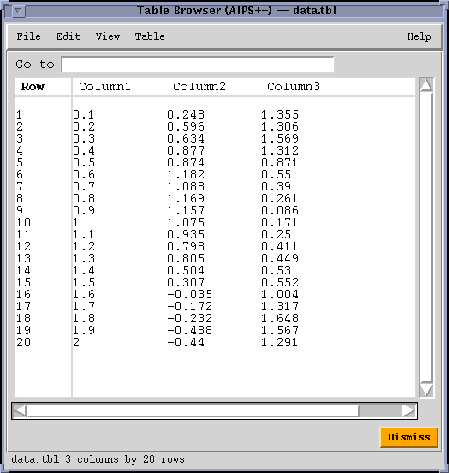
As our first example, let's read from an ASCII file into a table. Our ASCII data file, called SampleData.txt contains three columns:
0.1  0.248   1.355
0.2  0.596   1.306
0.3  0.634   1.569
0.4  0.877   1.312
0.5  0.874   0.871
0.6  1.182   0.550
0.7  1.088   0.390
0.8  1.169   0.261
0.9  1.157   0.086
1.0  1.075   0.171
1.1  0.935   0.250
1.2  0.798   0.411
1.3  0.805   0.449
1.4  0.504   0.530
1.5  0.307   0.552
1.6 -0.035   1.004
1.7 -0.172   1.317
1.8 -0.232   1.648
1.9 -0.488   1.567
2.0 -0.440   1.291
We can read these into a Table tool according to:
include 'table.g'
tbl := tablefromascii('sample.tbl','SampleData.txt', autoheader=T)
tbl.browse()
#
tbl.done()               # Destroy tool and free up resources when finished
Here we have created a AIPS++ table on disk called sample.tbl and filled it with the data. Note the use of the autoheader function argument to instruct the system to automatically work out the data type of each column. We then invoked the browse function of this tool to look at it. The figure below shows you what you would see.
There are other features of the browse GUI which you can use to examine the data. For example, under the Table item of the menu bar you will find a Plot selection which enables you to make simple plots of the data.
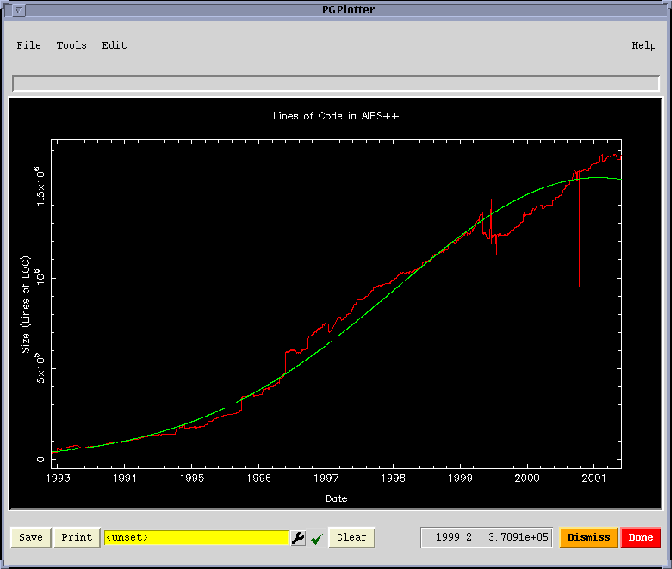
This example shows how to read the file containing the number of lines of code in AIPS++ and converts it into a plot. The file containing the lines of code is at ftp://aips2.nrao.edu/../linecount/source_lines.
This example uses basic Glish I/O rather than a Table tool, and includes writing some ad-hoc support Glish code. This is to show you the sort of flexibility Glish offers for this kind of processing.
The first 10 lines are:
Wed Nov 25 14:41:51 GMT 1992 29830
Tue Dec 1 01:08:02 GMT 1992 36557
Tue Dec 1 12:55:01 GMT 1992 36699
Wed Dec 2 12:55:01 GMT 1992 36951
Thu Dec 3 12:55:01 GMT 1992 36965
Fri Dec 4 12:55:01 GMT 1992 36965
Sat Dec 5 12:55:01 GMT 1992 36966
Sun Dec 6 12:55:01 GMT 1992 36966
Mon Dec 7 12:55:00 GMT 1992 36966
Tue Dec 8 12:55:00 GMT 1992 36966
First we need to define a function which will convert date strings (1999, Sept, 12) to a fractional numerical date 1999.69589.
include 'quanta.g'
toyears := function(yy, mm, dd)
{
  s  := spaste (dd, mm, yy)
  d  := dq.quantity(s)                      # Date
#
  s  := spaste ('01Jan', yy)
  d0 := dq.quantity(s)                      # Reference date
#
  offset := dq.getvalue(d) - dq.getvalue(d0)    # Numerical offset
  nyear := as_float(yy) + offset/365.0          # Result
#
  return nyear
}
Now we can read the file and apply some rudimentary checks as we go along:
parts := split(dq.time('today', form='dmy'), '-')
today := toyears(parts[3], parts[2], parts[1])

# We need some variables to hold the results
loc := [=]
loc.date := []
loc.size := []
nlines := 0

# Open the file containing the source lines and read a line
f:=open('< source_lines')
line := read(f)

# While there is something in the line, process it
while(sum(strlen(line)) > 0) {
  nlines +:= 1
  parts := split(line)
  loc.date[nlines] := toyears(parts[6], parts[2], parts[3])
  loc.size[nlines] := as_float(parts[7])

  # Simple post-hoc editing
  if((nlines>1)&&(loc.size[nlines]<0.5*loc.size[nlines-1])) nlines -:= 1
  if(loc.date[nlines]>today) nlines -:= 1
  if((parts[2]==19)&&(parts[3]==Jun)&&(parts[6]==1999)) nlines -:= 1
  # Get the next line
  line := read(f)
}

# Sort sizes on dates, and sort dates
rec.y := sort_pair(loc.date, loc.size)
rec.x := sort(loc.date)
To make a plot, we can use a Pgplotter tool:
include 'pgplotter.g'
p:=pgplotter()
p.plotxy(rec.x, rec.y, T, T, 'Date', 'Size (Lines of LOC)', 'Lines of Code in AIPS++')
Suppose that we now want to make a fourth order fit and plot the result. We'll fit to the logarithm of the lines of code to ensure that the prediction is positive. We use a Polyfitter tool to do the fit and the evaluation of the fit for the given dates.
include 'polyfitter.g'
pf:=polyfitter()
coeff:=[]; coefferrs:=[=]; chisq:=0; ypred:=[=];
#
pf.fit(x=rec.x, y=ln(rec.y), coeff=coeff, coefferrs=coefferrs, chisq=chisq,
         sigma=0.01, order=4)
pf.eval(x=rec.x, coeff=coeff, y=ypred)

p.sci(3)                       # Green
p.pt(rec.x, exp(ypred), -1)

# Destroy tools to free up resources when finished
pf.done()
p.done()
The plot looks like this:
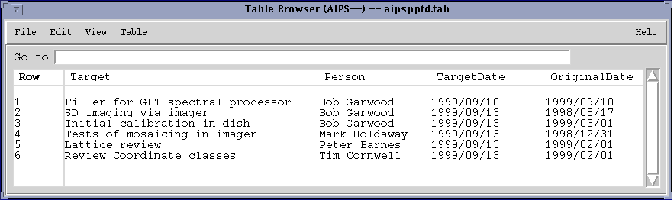
Each developer in AIPS++ has a list of software targets which is tracked through the development cycle. In this example, we read a list of developer target dates into an AIPS++ table.
Here are a few lines from such a list. Each entry is a string.
"Filler for GBT spectral processor" "Bob Garwood" "1999/09/10" "1999/09/10"
"SD imaging via imager" "Bob Garwood" "1999/09/13" "1998/08/17"
"Initial calibration in dish" "Bob Garwood" "1999/09/13" "1999/03/01"
"Tests of mosaicing in imager" "Mark Holdaway" "1999/09/13" "1998/12/31"
"Lattice review" "Peter Barnes" "1999/09/13" "1999/02/01"
"Review Coordinate classes" "Tim Cornwell" "1999/09/13" "1999/02/01"
We can convert this file to an AIPS++ table in the same way as the first example. We instruct the constructor to determine the header information (e.g. type and name of each column) automatically.
include 'table.g'
tbl := tablefromascii(tablename='aipspptd.tab', asciifile='aipspptd.csv',
                      autoheader=T)
tbl.browse()
When we browse the table, we see that it has four columns called Column1, Column2, Column3, Column4. To give these better names, we can write a short header file, let's call it aipspptd.hdr.
Target Person TargetDate OriginalDate
A A A A
If we now do the following, we'll get the desired names:
include 'table.g'
tbl := tablefromascii(tablename='aipspptd.tab', asciifile='aipspptd.csv',
                      headerfile='aipspptd.hdr')
tbl.browse()
This screen shot shows what the browser would show you:
For more information on the capabilities of the constructor see tablefromascii.
We can now use the Table Query Language (TaQL - see also Note199 and a GUI interface via taqlwidget) to select on the values in the columns. For example to see all entries that belong to 'Tim Cornwell', we do:
subtbl1 := tbl.query('Person==\'Tim Cornwell\'')
subtbl1.browse()
Note that we had to ``escape'' the single quote around the string 'Tim Cornwell' to prevent it being interpreted by Glish as the end of string.
To get all targets whose TargetDate has already passed:
subtbl2 := tbl.query('TargetDate<DATE()')
subtbl2.browse()
The TaQl DATE() function returns the current date when given no arguments. One could also have said:
subtbl2 := tbl.query('TargetDate>DATE(12Sep1999)')
subtbl2.browse()
to find all the target dates after 12Sep1999 (all but the first target).
To plot the time delays between the original target completion date and the current target completion date, we need to get the two date columns from the table, convert to days, and subtract. We can then use the histogram capability of a Pgplotter tool to display the histogram:
tdates := tbl.getcol('TargetDate')
odates := tbl.getcol('OriginalDate')
delay := []
for (i in 1:length(tdates)) {
   t1 := dq.getvalue(dq.totime(tdates[i]))         # Convert date strings to numeric time in days
   t2 := dq.getvalue(dq.totime(odates[i]))
   delay[i] := t2 - t1
}
#
include 'pgplotter.g'
p := pgplotter()
p.env(min(delay), max(delay), 0, 20, 0, 1)
p.hist(delay, min(delay), max(delay), 30, 1)
p.lab('Delay in days', 'Number', 'Histogram of target delays')
#
# Destroy tools to free up resources when done
#
p.done()
subtbl1.done()
subtbl2.done()
tbl.done()
In this example, a gain table associated with a visibility data set is written out of AIPS and read into AIPS++ for inspection and manipulation.
Begin by calibrating the data in AIPS (using the AIPS task CALIB) and obtaining a calibration table (SN or CL). There are two tasks in AIPS to write out AIPS tables, PRTAB and TBOUT. PRTAB outputs a limited number of significant digits and should not be used; TBOUT allows for the output of double precision numbers and should be used. The DOCRT verb, which specifies the maximum width of the column in characters should be set to something large, such as 10000. Execute the TBOUT task to create the output ASCII table file and then copy the file into a directory where you will run AIPS++. The following is a typical input to TBOUT:
AIPS 1: TBOUT:  Task to Write AIPS tables to text files.
AIPS 1: Adverbs         Values            Comments
AIPS 1: ----------------------------------------------------------------
AIPS 1: USERID        0                    Image owner ID number
AIPS 1: INNAME     '10/11/96    '          Image name (name)
AIPS 1: INCLASS    'X BAND'                Image name (class)
AIPS 1: INSEQ         1                    Image name (seq. #)
AIPS 1: INDISK        4                    Disk drive #
AIPS 1: INEXT      'SN'                    Extension type
AIPS 1: INVERS        1                    Extension file version #
AIPS 1: OUTFILE    'DR21_SN.ASCII          External text file name.
AIPS 1:
AIPS 1:               '
AIPS 1: DOCRT         1                    Max width of output (char)
AIPS 1: BCOUNT        1                    Begin Table record to Write
AIPS 1: ECOUNT        0                    End Table record to Write
After TBOUT has completed, start up AIPS++ and read the ASCII table, using the Table tool tablefromascii consructor.
include 'table.g'
tbl := tablefromascii('DR21_SN.tbl', 'DR21_SN.ASCII', readonly=F)
Assume that antenna 5 has significant fluctuations in its gain and you want to replace the determined gains with a 5th order polynomial fit to smooth out the variations. The Table module allows for data to be read into and out of Glish variables. The Mathematics module contains the functionality to carry out numerical operations, such as polynomial fits (Polyfitter.fit) as well as evaluation the resulting fits (Polyfitter.eval). The following session shows how to carry out the procedure described above.
include 'polyfitter.g'
tbl2 := tbl.query("ANTENNA==5")                # Creates a reference table holding only ANTENNA 5
#
x := tbl2.getcol("TIME")                       # Get data
yin := tbl2.getcol("REAL1")
#
pf:=polyfitter()                               # Make fitter and fit
local coeff, coefferrs, chisq0, ypred, errmsg, yout
pf.fit(coeff, coefferrs, chisq, errmsg, x, yin, order=5)
pf.eval(yout, errmsg, x, coeff)
#
ok := tbl2.putcol("REAL1", yout)               # Put data back into reference and hence parent table
#
tbl2.done()
tbl.done()
pf.done()
You can look at the gains as a function of time (both raw data and polynomial fit) by using the browse function.
The modified table can now be read back into AIPS using the AIPS task TBIN.
In this example, a table with two columns is created and then populated with some data. The first column is floating point data, the second column ascii.
tableName := 'junk.tbl'                                    # Name of table
nameCol1 := 'Velocity'                                     # Names of columns
nameCol2 := 'Colour'
c1 := tablecreatescalarcoldesc(nameCol1, 1.0)              # Column descriptors with template data type
c2 := tablecreatescalarcoldesc(nameCol2, 'A')
#
#
td := tablecreatedesc (c1, c2)                             # Combine column descriptors into table descriptor
#
#
nrow := 5
t := table (tableName, td, nrow)                           # Create table with given number of rows
#
#
col1Data := [pi, pi/2, pi*3, 0.0, -10.0]                   # Make some data of the right type and length
col2Data := "red green brown blue pink"
#
#
t.putcol(nameCol1, col1Data)                               # Insert columns
t.putcol(nameCol2, col2Data)
#
t.browse()                                                 # Browse
#
t.done();                                                  # Destroy tool leaving disk file