
 News News |
FAQ
|
| Search
|
Home
|
| Getting Started | Documentation | Glish | Learn More | Programming | Contact Us |
|
| Version 1.9 Build 1488 |
|


Contributors: Athol Kemball, George Moellenbrock, Debra Shepherd, & the NRAO AIPS++ Users Group
Version: July 22, 2003
This document describes how to calibrate and image VLA data using the
Astronomical Information Processing System (AIPS++). AIPS++ is a
suite of astronomical data reduction tools that can be run via
an interactive command language called Glish.
The development of mouse-based Graphical User Interfaces (GUIs) have been suspended for the time being as we await the development of a new AIPS++ framework using the ALMA Common Software (ACS). The plan is to convert the command language to Python (although Glish will still be available) and GUIs will be developed using JAVA.
Besides this cookbook, you will also need to access AIPS++ documentation on the web at: http://aips2.aoc.nrao.edu/stable/docs/user/documentation.html This will tell you what input parameters are available for each function as well as provide guidelines for procedures not covered in this cookbook. AIPS++ documentation consists of:
If you have experience with AIPS or MIRIAD software packages to reduce interferometric data, you may be interested in AIPS-aips++ and MIRIAD-aips++ dictionaries which provide a partial mapping of common AIPS and MIRIAD tasks/adverbs to their counterparts in AIPS++. These dictionaries are also given in Appendicies 1 and 2.
This section assumes that AIPS++ has been installed on your UNIX or LINUX system. First, create an .aipsrc file in your home directory which will set some defaults and optimize run time. See Getting Started for a description of how to set up your .aipsrc file. An example .aipsrc file is given in Appendix 3.
To start AIPS++, cd to the directory you want to work in and type in an xterm window:
source /aips++/stable/aipsinit.csh    # source the stable version of
                                      #   the aipsinit.csh file that
                                      #   specifies setup parameters
aips++                                # start aips++
Check with your system administrator if you cannot locate the aipsinit.csh file.
You should get a Glish command prompt in the xterm window where you started AIPS++, a Tool Manager GUI window, and a Logger GUI window (Fig. 1.1). AIPS++ will take about a minute to initialize at startup. It is active when you get a ''-'' prompt at the command line interface.
The Tool Manager GUI has several possible views which are accessed by the buttons near the top. When you launch AIPS++, there are two buttons: one called Manager which is activated, and a Tools in use button. To change between different views, point the mouse cursor to the appropriate button and click on it with the left mouse button.
How do I exit from AIPS++?
There are two ways to exit AIPS++:
From the Tool Manager GUI, select
file
![]() Exit AIPS++
Exit AIPS++
Or simply type at the Glish command line interface:
exit
and press return.
AIPS++ is a tool-based reduction package where related functions are gathered into `tools'. The user creates a working version of a particular tool by logically associating it with a dataset and giving the tool (data + functionality) a name. The different capabilities of this tool are then accessed by running one or more functions within that tool. For example, to plot calibration solutions, you would first create a calibration tool and run the associated plotcal function. This involves the following steps:
To execute this sequence, type at the Glish command line prompt:
include 'calibrater.g';                   # Include the calibrater tool
cal:=calibrater(data='mydata.ms');        # Create a calibrater tool
                                          #   for the data 'mydata.ms'
                                          #   and call it 'cal'
cal.plotcal(plottype='amp',               # Execute the function plotcal
            tablename='cal.solutions');   #   specifying parameters
                                          #   plottype & tablename
cal.done();                               # End use of tool
All tools have a Done function which undoes the explicit association
of the tool and data.
To see what parameters are associated with the plotcal function (or
any function or tool in AIPS++ go to:
http://aips2.aoc.nrao.edu/stable/docs/user/documentation.html
The User Reference Manual gives a listing of each parameter with some
examples. Detailed help on Synthesis calibration and imaging can be
found in the ``Generic Processing'' chapter.
The ``Basic Tools'' chapter gives details on Plotting, image display
and analysis.
When working from the Glish command line in AIPS++, basic tools for VLA data reduction and imaging must be initialized first. Type at the Glish command prompt:
include 'vlafiller.g';
include 'ms.g';
include 'flagger.g';
include 'imager.g';
include 'msplot.g';
include 'calibrater.g';
include 'image.g';
include 'imagepol.g';
include 'viewer.g';
A note about Glish syntax: Notice the semi-colon at the end of each Glish line? This is an explicit end-of-line indicator that tells Glish that you are finished with the inputs. Although it is not necessary, it can be helpful. For instance, say you are typing in a long series of inputs for a tool, you have made multiple carriage returns, you think you are done but Glish is just sitting there waiting for more inputs. What goes? Well, you probably made a typo somewhere along the way. So, just type a semi-colon at the command line prompt to force an end-of-line. You will then get an error message telling you that the syntax is wrong. Fix the syntax error, re-submit the command and AIPS++ will start execution.
It is also convenient to start up a viewer tool to view and analyze images easily. To start the default viewer type:
include 'viewer.g';        # Include the viewer tool
dv.gui();                  # Start up the default viewer (dv) GUI
You will get two popup GUIs displayed, the viewer Display Panel and the viewer Data Manager panel that you can use to select and view any AIPS++ or FITS image (Fig. 1.2). You can put these off to the side until you are ready to use them or left-click on their Done buttons to close the tools. Note: once the aipsinit.csh file has been sourced, you can start the viewer directly from the UNIX prompt by typing viewer.
To find the location of a particular tool, go to the Tool
Manager GUI, type in the name of the desired tool in the
Search string space and hit return. Left-click with your mouse on the
Show search Results button. A list of possible locations for
the tool will appear in a popup section. The general syntax will be:
package.module.tool or
package.module.tool.function or
package.module.tool.constructor or
package.module.global function
When you are done, dismiss the list. As an example:
Type 'advise' in the Search string entry.
One of the strings you will see when you left-click on the Show search Results button is: synthesis.imager.imager.advise
which implies that 'advise' is a function of the tool imager which is contained in the module imager of the package called synthesis.
The data reduction categories covered in this document are those for continuum data, continuum polarimetry and spectral-line data. Individual steps in each data reduction sequence are illustrated using Glish scripts. The reduction sequences given in this document use the following AIPS++ tools:
First, check that your inputs are correct. You can get help from the Tool Manager window by left-clicking on the Help button and choosing the Reference Manual option. This will drive your browser to the AIPS++ detailed documentation on each tool. From this web page, you can also reach the main AIPS++ documentation site (left-click on Documentation in the upper left of the web page) or you can run a Search on key words you are interested in.
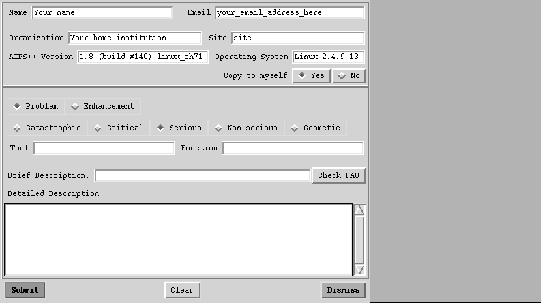
If your inputs are correct and you are still having problems, you may have discovered a software bug. If you find a bug during your data reduction session, type at the Glish command line prompt:
bug()
Or, using the Tool Manager Help button, choose Report a
bug option. This will bring up a bug report GUI (Fig. 1.3) that you
can fill in and submit automatically within AIPS++.
 |
If something has gone wrong and you want to force an exit, type a 'Control-C' in the Glish window. Glish will ask you 'exit glish (y/n)?' Answer yes by typing 'y.' Save this technique for emergencies.
If you manage to find yourself in a hung state (don't worry, this is rare), you can always kill AIPS++ from a LINIX or UNIX command line with:
       LINUX:   ps -aux | grep aips++
        UNIX:   ps -aef | grep aips++

    Note the process ID numbers listed and kill them with the command:

                kill -9 process_id
Visibility data in AIPS++ are stored in an AIPS++ table known as a MeasurementSet (MS). An MS consists of a main table containing the visibility data and associated sub-tables containing auxiliary or secondary information. The full MS data format is described in AIPS++ Note 229. Tables 1 & 2 identify the commonly accessed components of the MAIN table and list data selection parameters used during typical data reduction sessions.
All AIPS++ data files, including MeasurementSets, are written into the current working directory by default, with each AIPS++ Table represented as a separate sub-directory. MS names therefore need only comply with UNIX file or directory naming conventions, and can be referred to from within AIPS++ directly, or via full pathnames.
Each row of the DATA column in the MS contains a matrix of observed complex visibilities at a single time stamp, for a single baseline in a single spectral window. The shape of the data matrix is given by the number of channels and the number of correlations (voltage-products) formed by the backend instrument of the telescope (e.g. a correlator for an array, or a spectrometer for a single dish).
| Name | Format
|
Comments |
| DATA | Complex(Nc, Nf) | Complex visibility matrix |
| Observed DATA for synthesis arrays | ||
| WEIGHT | Float(Nc) | Weight for whole data matrix |
| FLAG | Bool(Nc, Nf) | Cumulative data flags |
| CORRECTED_DATA | Complex(Nc, Nf) | Corrected data created by calibrater or imager tools |
| MODEL_DATA
|
Complex(Nc, Nf) | Model data created by calibrater or imager tools |
| IMAGING_WEIGHT | Float(Nc) | Imaging weight, e.g. uniform, natural, robust |
| Created by calibrater or imager tools |
![]() Additional data attributes are described in AIPS++
Note 229
Additional data attributes are described in AIPS++
Note 229
![]()
![]() Nc= number of correlators,
Nf= number of frequency channels.
Nc= number of correlators,
Nf= number of frequency channels.
![]()
![]()
![]() The MODEL_DATA column is created
with initial values: amplitude = 1 & phase = 0o.
The MODEL_DATA column is created
with initial values: amplitude = 1 & phase = 0o.
| Parameter | Contents |
| ANTENNA1 | First antenna in baseline |
| ANTENNA2 | Second antenna in baseline |
| FIELD_ID | Field (source no.) identification |
| SPECTRAL_WINDOW_ID | Spectral window number (IF no.) |
| ARRAY_ID | Subarray number |
| OBSERVATION_ID | Observation identification |
| POLARIZATION_ID | Polarization identification |
| SCAN_NUMBER | Scan number |
| TIME | Integration midpoint time |
| UVW | UVW coordinates |
![]() Selection of data from an MS currently appears in different
guises in the various synthesis tools due to independent development
of these tools. An effort to reconcile these differences is underway.
Selection of data from an MS currently appears in different
guises in the various synthesis tools due to independent development
of these tools. An effort to reconcile these differences is underway.
Calibration and imaging responsibilities are divided between the calibrater and imager tools. The calibrater tool handles visibility-plane calibration while the imager tool deals with image formation, deconvolution and image-plane calibration.
In a typical synthesis observation, a number of calibrators of known structure (usually point sources) and at least one of known flux density are observed in addition to the scientific target(s) in order to obtain a measure of the systematic properties of the instrument and, if relevant, the corrupting media above it. The effects of these systematic properties are then removed from the data for the scientific target. This technique is often referred to as cross-calibration and its success depends implicitly on the relationship between: 1) the true brightness distribution of the observed radio sources (what we are after); 2) the formal response of the instrument and its variety of imperfections of varying importance (what we are calibrating); 3) and the data that is actually recorded (what we have measured).
The AIPS++ Measurement Equation, originally defined by Hamaker, Bregman, & Sault (1996a, 1996b), is an explicit description of this relationship. The Measurement Equation (in the visibility plane) for a spectral line polarization calibration is given by
|
|
(1.1) |
where:
Note that the Measurement Equation is a matrix equation.
![]() and
and
![]() are 4-vectors with
elements for each correlator product, and the Tij, etc., are
4x4 matrices that `corrupt' the correlator products according
to the properties of the specific term. The order of the corrupting
terms from right-to-left, for the most part, is the order in which the
errors affect the incoming wavefront. AIPS++ hardwires the
Measurement Equation order and all of the specific algebra associated
with the individual terms. As such, it is usually possible to ignore
the fact that the Measurement Equation is a matrix equation, and treat
the different terms as labeled `components' (black boxes) along the
signal path.
are 4-vectors with
elements for each correlator product, and the Tij, etc., are
4x4 matrices that `corrupt' the correlator products according
to the properties of the specific term. The order of the corrupting
terms from right-to-left, for the most part, is the order in which the
errors affect the incoming wavefront. AIPS++ hardwires the
Measurement Equation order and all of the specific algebra associated
with the individual terms. As such, it is usually possible to ignore
the fact that the Measurement Equation is a matrix equation, and treat
the different terms as labeled `components' (black boxes) along the
signal path.
In practical calibration, it is often best to begin the calibration process by determining solutions for those terms which affect the data most. Thus, the user would normally determine gain solutions (G) first (applying pre-computed parallactic angle corrections P if doing polarization calibration), then bandpass solutions (B) and/or polarization solutions (D). Errors which are polarization-independent (T) can be determined at any point in the calibration process. T has nearly identical form to G but it located at a different point in the Measurement Equation. A practical advantage to this factorization is the ability to store polarization-independent effects which are characterized by a certain timescale or a particular parametrization (e.g., tropospheric opacity) as a separate calibration factor, thus isolating them from electronic gain effects which may vary on a different timescale and/or with different systematics. Although most data reduction sequences will probably proceed in this order, the user has complete freedom and flexibility to determine the order in which calibration effects are solved for. Self-calibration, the process by which an improved model of the target source is used to obtain improved solutions for the calibration, is also not limited to just the electronic gain (G) corrections, as has been traditionally the case. Improved solutions for, say, the instrumental polarization (D) may be obtained by self-calibration as well. In general, decision-making along the calibration path is a process of determining which effects are dominating the errors in the data and deciding how best to converge upon the optimal set of calibration solutions (for all relevant components) and source models which best describe the observed data.
Once the calibration solutions have been determined, the AIPS++ software applies the solutions according to the order defined by the Measurement Equation. The individual calibration components represented in the Measurement Equation are described in detail in the Synthesis Calibration chapter of Getting Results. The generalization of the Measurement Equation to image plane effects is also described there.
The observed data,
![]() , are stored in the DATA column in
the MAIN table of the MS; these are the raw data as loaded by the
filler tool or imported from a UVFITS file. Associated with the DATA
column are related columns to hold the most recent version of the
calibrated data (CORRECTED_DATA), and the latest visibility plane
representation of the source or field model,
, are stored in the DATA column in
the MAIN table of the MS; these are the raw data as loaded by the
filler tool or imported from a UVFITS file. Associated with the DATA
column are related columns to hold the most recent version of the
calibrated data (CORRECTED_DATA), and the latest visibility plane
representation of the source or field model,
![]() ,
(MODEL_DATA). The latter two columns are filled in by the
calibrater and imager tools,
respectively. The actual calibration information is stored in
separate calibration tables. The observed DATA column does not
change during reduction, but the related columns do. When plotting
the data using a tool such as msplot, the data
sub-types (observed, corrected, and model) can be selected
individually.
,
(MODEL_DATA). The latter two columns are filled in by the
calibrater and imager tools,
respectively. The actual calibration information is stored in
separate calibration tables. The observed DATA column does not
change during reduction, but the related columns do. When plotting
the data using a tool such as msplot, the data
sub-types (observed, corrected, and model) can be selected
individually.
Listed below are the basic steps for typical continuum and spectral line data reduction sessions which solve for and apply the standard complex gain (G), the polarization leakage (D), and the relative bandpass (B).
Since reduction of continuum, spectral-line, and polarimetry data in AIPS++ differ essentially only in the addition or omission of specific steps, and in the details of a few parameter settings, only one pass through the basic reduction path is described here. In the remainder of this document, annotated sequences of glish for both continuum polarimetry and spectral-line reduction are included in parallel. Some actions apply to only one type of reduction, but all methods are instructive for either type of observation.
The basic reduction sequence is:
Keep in mind that these examples are basic ones. More sophisticated sequences are possible. For example, it may be desirable to obtain bandpass calibration from an optimum calibrator, and to apply this on-the-fly during full-out G calibration on a different calibrator. This operation can be performed in the G and B calibrations steps listed above for the bandpass calibrator only, then repeating the G calibration step for the other calibrators with the B calibration applied. In fact, any sequence of operations of this nature is possible; the fundamental requirement is that calibration components that significantly influence the one being solved for should be applied prior to the solution.
The two sample datasets used in the examples below are available from the AIPS++ Data Repository. The Data Repository is usually created in the directory /aips+ +/data/ when AIPS++ is installed on a UNIX or LINUX machine (check with your AIPS++ system administrator if the data are not here). You can create AIPS++ MeasurementSets from this data directly as described below using the ms tool.
The Glish sequences listed below describe calibration and imaging steps and are available as full end-to-end scripts in the AIPS++ Recipe Repository. Scripts in the Repository can be easily modified to reduce and image similar data.
The continuum polarimetry data set is a full-polarization, VLA A-configuration observation at 5 GHz (one spectral window) of the gravitational lens 0957+561. A nearby point-like calibrator (0917+624) has been observed alternately with the target source. 3C286 is used for both flux density scaling and instrumental polarization calibration. The Glish script is available here: continuum polarimetry.
The spectral-line dataset is a short VLA D-configuration observation of HI (redshifted to 1413 MHz) in NGC5921. This dataset was observed in total intensity only (RR & LL), with 63 channels in a single spectral window. A nearby phase calibrator (1445+099) was observed, as well as 3C286 for flux density calibration. The Glish script is available here: spectral line.
For clarity in distinguishing operations for each of the sample datasets, tools associated with the continuum polarimetry reduction have names ending in `C' (e.g. imgrC, calC), and those associated with the spectral-line reduction have names ending in `S' (e.g. imgrS, calS).
There are two paths for importing VLA data into AIPS++: directly from a VLA archive or distribution tape, or from a UVFITS disk file generated by the AIPS task FITTP. Both methods are described here. The example data sets from the Data Repository are UVFITS files that have been created using the AIPS task FITTP.
Data which have been exported to a disk file from AIPS using the task FITTP can be read into AIPS++ using the general UVFITS filler ms.fitstoms, which itself creates an ms tool. The example data sets from the AIPS++ Data Repository are in this format:
To fill the example continuum data into a MeasurementSet from a UVFITS file, type at the Glish prompt (or just cut & paste from a file):
msetC:=fitstoms(msfile='ap366.ms',
                fitsfile='/aips++/data/demo/AP366-09C1.fits');
                                            # Construct the ms tool for
                                            #  the Continuum data set located
                                            #  in the AIPS++ Data Repository
msetC.summary(verbose=T);                   # Write a summary to the logger window
msetC.done();                               # Finish ms tool
The detailed summary of the example data set is given in Appendix 5.
To fill the example spectral line data into a MeasurementSet from a UVFITS file, type at the Glish prompt (or just cut & paste from a file):
msetS:=fitstoms(msfile='ngc5921.ms',
                fitsfile='/aips++/data/demo/NGC5921.fits');
                                            # Construct the ms tool for
                                            #  the spectral line data set located
                                            #  in the AIPS++ Data Repository
msetS.summary(verbose=T);                   # Obtain summary
msetS.done();                               # Finish ms tool
The detailed summary of the example data set is given in Appendix 5.
VLA data in on-line archive format are read into AIPS++ from disk or tape using the vlafiller tool. Tape drives can be located on the local system or on a remote system accessible on the network. Use of a remote tape drive requires knowledge of the network host name (e.g. gibbon.cv.nrao.edu, or gibbon), and the tape device name (e.g. /dev/rmt/0ln). This can often be determined from the physical drive itself, or by logging on to the remote host and using a UNIX utility such as sysinfo or the UNIX command ls -lut /dev/r[ms]t* to list the device name.
Remote tapes need not be explicitly mounted from AIPS++ as the vlafiller itself will be run on the remote system directly. If you encounter problems in using the filler on a remote host, make sure that the AIPS++ initialization command source /aips++/release/aipsinit.csh is included in your .cshrc file (or the sh equivalent).
The vlafiller tool allows selection on frequency band, calibrator name, frequency range, project, time, subarray, and source, and supports concatenation to an existing uv-data set. To run the vlafiller using a local tape drive, you can use the vlafillerfromtape global function, e.g.:
vlafillerfromtape(msname='cals00feb.ms',       # Load project TESTT from tape to
                  device='/dev/rmt/0ln',       # MeasurementSet cals00feb.ms
                  files=[2,3],                 # Read only files 2 and 3 on tape
                  project='TESTT');            # in current directory
Note: the first file on a VLA archive tape is always a house keeping
file. Thus, if you try to read it, the AIPS++ filler will report
that it is not in the appropriate format.
To fill data into AIPS++ using a remote tape drive, set the host
name, e.g.:
vlafillerfromtape(msname='/home/cals00feb.ms',   # Load project TESTT from remote
                  device='/dev/rmt/0ln',         # tape on host 'gibbon' to MS
                  files=[2,3],                   # Read files 2 and 3 on tape
                  project='TESTT',               # cals00feb.ms in /home directory
                  host='gibbon');                # on remote host
Note that it is necessary to specify a full path name (recognizable by
the remote host) for the output file when filling from a remote tape
drive.
Alternatively, you can use the vlafiller tool (rather than the global function) to set up the filler inputs separately and then run the filler from the Glish command line:
include 'vlafiller.g';
vfill:=vlafiller();
vfill.tapeinput(device="/dev/rmt/0ln" , files=[2,3] );
vfill.output(msname='cals00feb.ms', overwrite=F);
vfill.selectproject(project='TESTT');
vfill.fill(verbose=F, async=F);
vfill.done();
To obtain a summary of the dataset's properties after filling, construct an ms tool, and run the ms.summary function:
mset:=ms(filename='cals00feb.ms');      # Construct the ms tool for the data
mset.summary(verbose=T);                # Write a summary to the logger window
mset.done();                            # Finish ms tool
Copy the summary information into a file for later use (source or FIELD_ID numbers and the times different sources are observed are particularly useful).
Once the data have been filled to a MeasurementSet, they can be examined or displayed using various tools. The Catalog tool provides an overview of AIPS++ data files at the highest level, as individual AIPS++ tables of different types (e.g. images, MS, etc) in a given directory. To bring up the Catalog tool (Fig. 1.4) using Glish type:
include 'catalog.g'
dc.gui()                     # dc is the default catalog tool.
When you click on the View button (to view the presently selected catalog item) you will launch the tablebrowser which provides facilities to browse and examine all data fields in the MS main and sub-tables.
Note that indices in the MS, such as FIELD_ID, are stored as integers beginning with zero when viewed at the low level provided by the tablebrowser. All AIPS++ synthesis tools correct for this artifact of C+ + and present selection of indices beginning at one.
The primary graphical visibility data visualization tool in AIPS++ at present is msplot. msplot allows line and raster plots of the
observed, corrected, and model data against a range of MS indices and
parameters, as well as associated plots such as uv-coverage.
Facilities are provided to support versatile data selection, range
setting and plot iteration. Interactive editing is also supported, as
described in the next section.
To start msplot from the Glish command line interface type:
include 'msplot.g'
plot := msplot(msfile='ap366.ms',
            edit=T);                # Allow editing as well as inspection
The msplot control GUI will come up (Fig. 1.5). Left-click on the Data selection button to get data selection criteria. Type a field number in the FIELD_ID input to see a particular source. Then, in the top left corner of the msplot control GUI, select ``Plot X vs Y'' - the default is to plot uv distance vs. observed amplitude. To plot something different, click on the X axis or Y axis buttons to select and scroll your cursor to the option you want. Once you have selected the subset of the data you want to plot and how you want to plot it, left-click on Go (upper right on the msplot interface) to create the plot. In the plot window (right panel of Fig. 1.5), you can use the cursor to select regions and then left-click on the Locate button to identify baselines associated with each uv point. Left-lick on the Flag or Unflag buttons on the plot to flag/unflag selected data.
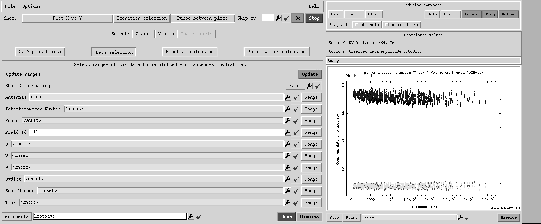 |
While you are in the msplot function, you can get a plot of antenna locations in the array. To do this, Left-click on the Data selection button. To the right of the ANTENNA selection space is a ``wrench'' icon, left-click on the wrench and choose the FROM MS option. A plot of antenna locations (Fig. 1.6) will pop up in a separate window. You can use this plot to select antennas in the array to plot (e.g. use your left-mouse button to draw one or more boxes around antennas to select them, then click on the Accept button to write those antenna names to the msplot data selection window for plotting). You can print this plot to hardcopy by left-clicking on the File button and choosing the print option. This plot is useful to choose a well-behaved antenna near the center of the array for your reference antenna. For the continuum polarimetry dataset, Antennas 2, 4, 8, & 9 are all good choices. When you are finished with the plot, left-click on the Dismiss button in the lower right corner of the antenna plot. Note: you can also identify antennas near the center of the array using the ms.summary listing of antenna locations (Appendix 4). For example: Antenna 4, located at Station VLA:W8, is only 8 meters from the array center on the West arm.
When you are finished with the msplot tool, click on the Done button in the lower right corner of the msplot GUI.
 |
include 'msplot.g'
plot := msplot(msfile='ngc5921.ms',
            edit=T);                # Allow editing as well as inspection
(See Fig. 1.5.) Obtain an antenna plot as described
in the previous section (Fig. 1.6; Antennas 2, 3,
14, or 23 are all good choices for references antennas because they
are centrally located in the array and are well-behaved. Click on the
Done button in the msplot GUI when you are finished with
the tool.
Interactive editing is possible on almost all graphical views of the data when msplot is created with the option EDIT=True. While the data is being displayed and edited, flag commands are saved in a file in your current directory. The flags are not actually applied to the data until you exit msplot. When you click on the Done button in msplot, you will be asked if you want to apply the flags or not: click on Yes if you want the flags applied.
To flag data, use the msplot control GUI to select all or a
subset of the data (e.g. select all data for a single source, and plot
amplitude versus time). In the plot window, draw boxes with the left
mouse button to select regions, e.g.:
1) Move the cursor to a corner where you want to box
emission;
2) Click on the left mouse button and hold it down while you
drag the mouse to the opposite side of the region;
3) Release the mouse button when you have the region the
size you want it.
4) Hit the ``Escape'' key on your keyboard to remove a
region.
Click on the Locate button to identify the antennas or
time range of the selected data (results will be displayed in the
logger window). Note that the listing may be very long if the
region selected covers a large number of visibility points. Click on
the Flag button to write flags to a file. Multiple flag regions
may be selected before executing the Flag option.
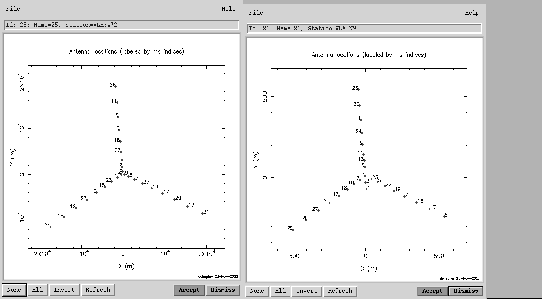
Examine the data in ap366.ms using msplot. First, plot
calibrator data in FIELD_ID 11 (1328+307 = 3c286 - the flux
calibrator). In the msplot control panel (see
e.g. Fig. 1.5):
Choose the plot type PLOT X VS Y.
Select X AXIS=uvdist.
Select Y AXIS=amplitude.
Click on the Go button to make the plot in
Fig. 1.7.
Use the locate button to identify low points.
Observed data points between 0.7 and 0.8 Jy are the RR & LL
correlations (corresponding to the actual amplitudes of the uv
data). Plot data in an XY plot with time vs. amplitude next. The
lower points near 0.1 Jy are the RL & LR correlations. Repeat this
procedure for FIELD_ID 9 (0917+624 - the gain calibrator). The
calibrator data look very good - there are no major outliers so you do
not have to edit this data before calibration.
Examine the data in ngc5921.ms using msplot. First, plot
calibrator data in FIELD_ID 1 (1328+307 = 3c286 - the flux calibrator) In
the msplot control panel:
Choose the plot type PLOT X VS Y.
Select X AXIS=uvdist.
Select Y AXIS=amplitude.
Limit the spectral selection to look at a single
channel, say one in the middle: channel 30.
(click on the SPECTRAL SELECTION button in the
ms control panel to choose channels).
Click on the Go button to make the plot in
Fig. 1.8.
Use the locate button to identify low points.
The observed data plotted are the RR & LL correlation. Cross
correlation (RL & LR) are not in this dataset.
Plot data in an XY plot with time vs. amplitude next. Hey! The data
look pretty good (Fig. 1.8)! No obvious flagging
needed based on the msplot plots. It is noisier than the
continuum data set example but that is because the RMS is higher
because the band width of a single channel is relatively narrow.
Command-based editing capabilities are supported in the flagger tool. flagger is useful because it can select data of a particular type, or with particular attributes and flag these data automatically. In general, this involves selecting the data to be flagged and then running a flagging operation. The flagging commands all have the option to run them on a trial basis.
No flagging is necessary for the continuum data in ap366.ms.
We want to flag the autocorrelations in the MeasurementSet ngc5921.ms, type:
  fg:=flagger(msfile="ngc5921.ms" );
  fg.flagac();
  fg.done();
The logger window will report:
Flagging 1619 rows
Example 1:
To clip data in data.ms in fields 9 & 11, spectral window 1, for which
the RR & LL data (pols 1 & 4) are outside of the amplitude range
5-10 Jy:
fg:= flagger(msfile='data.ms')                 # Start flagger tool.
fg.setids(fieldid=[9, 11],                     # Select fields &
          spectralwindowid=1);                 #  and spectral window.

fg.setpol(pol=[1, 4] );                        # Select RR & LL for testing.
fg.filter(column="DATA",                       # Select filter,
          operation="range",                   #  test for data outside of
          comparison="Amplitude",              #  amplitude range, run trial
          range="5.0Jy 10.0Jy",                #  to see how many data points
          fullpol=T,                           #  would be flagged.
          trial=T);
fg.filter(column="DATA",                       # Flag the data now.
          operation="range",
          comparison="Amplitude",
          range="5.0Jy 10.0Jy",
          fullpol=T,
          trial=F);
fg.done();                                     # Close flagger tool.
In this example, the setids and setpol functions select
the data that will be tested. The filter tests to see whether
the selected data (the observed DATA column) is within the specified
range, if it is not, then the data is flagged. The range here is
applicable to the RR & LL polarizations (pols 1 & 4). But, if the
RR & LL polarizations are bad, it is a good idea to flag the
cross-polarizations, RL & LR. This is done by setting FULLPOL=T to flag RL, LR data even though it wasn't tested by the
filter function. The first call to the filter function
was just a trial. The logger window will report how many data will be
flagged, e.g.:
Filtering (in range mode) would have flagged 6220 additional data points
The second call to the filter function actually flags the data.
Example 2:
To flag data from antenna = 5, spectral window = 1, field_id = 2,
within a specified timerange using the Tool Manager GUI, select:
fg.setantennas(ants=5)                       # Select data including antenna 5
fg.setids(spectralwindowid=1,fieldid=2)      # Select spectral id and field id
fg.settimerange(starttime="24-FEB-2000/10:00:05",  # Select timerange
                endtime="24-FEB-2000/10:09:37");
fg.state();                                  # Review data selection
fg.flag(trial=T);                            # Trial run to see how many rows
                                             #   will be flagged
fg.flag();                                   # Flag it
fg.reset();                                  # Reset the data selection
In this example, the state function reviews the state of
the fg tool to make sure all the inputs are the way
you want them. The state of the tool will be reported in the rolldown
Tool status bar (see Fig. ![[*]](../../gif/latex2html/cross_ref_motif.gif) )
Running the fg.flag function with TRIAL=T
produces a message in the logger window of how many rows of data will
be flagged with this operation. Setting TRIAL=F actually
flags the selected data. Finally, the fg.reset function resets
the state of the flagger tool and you can start with a clean slate.
)
Running the fg.flag function with TRIAL=T
produces a message in the logger window of how many rows of data will
be flagged with this operation. Setting TRIAL=F actually
flags the selected data. Finally, the fg.reset function resets
the state of the flagger tool and you can start with a clean slate.
Example 3:
To flag data from baseline 3-4, spectral window 2,
field_id 1, within ![]() 10s of a timestamp:
10s of a timestamp:
fg.setbaselines(ants=[3,4])                  # Select data for baseline 3-4
fg.setids(spectralwindowid=2,fieldid=1)      # Select spectral id and field id
fg.settime(centertime="24-FEB-2000/10:00:05",  # Select time and range
           delta="10s");
fg.state();                                  # Review data selection
fg.flag();                                   # Flag it
In the above examples, time-related data selection options (set by
flagger.settimerange and flagger.settime) and
the two antenna-related data selection options (set by
flagger.setantennas and flagger.setbaselines are logically OR'd. The
net time selections, net antenna selections, and all other selections
are then AND'd together. Note that the data selection persists after
the flagging operation flagger.flag is executed. To clear the
selection, execute the flagger.reset function, or execute individual
selection commands without arguments to clear only that particular
selection.
Example 4:
To flag all data on antenna 11 for the same spectral window,
field, and timestamp as for baseline 3-4 in the previous example:
fg.setbaselines();                # Clear the baseline selection
fg.setantennas(ants=11);          # Select antenna 11
fg.state();                       # Review data selection
fg.flag();                        # Flag it
Example 5:
To restore or unflag data for baseline 11-15 (that was flagged above):
fg.setantennas();                 # Clears antenna selection
fg.setbaselines(ants=[11,15]);    # Select baseline 11-15
fg.state();                       # Review data selection (note
                                  #  other selections still in
                                  #  effect)
fg.unflag();                      # undo previous flags
Note that use of flagger.unflag may restore data that had been flagged
by other means (e.g., by the on-line system, or by other criteria in
previous use of flagger or msplot).
Example 6:
One can also use the flagger tool to select and flag specific
types of data. For example, it is usually desirable to flag the
auto-correlation data from the VLA if they were filled with the
cross-correlations (otherwise, the imager tool will attempt to use
it in image formation as if it were single dish data). To do this:
fg.reset();                   # Reset the data selection
fg.flagac();                  # Flag the auto-correlations
Example 7:
It is also often the case that the VLA data near the beginning of scans is bad
(e.g. after field or frequency band changes). To flag such
data, use the flagger.quack function. For example, to remove 20
seconds of data at the beginning of scans (defined by gaps larger than
30 seconds) on field 3:
fg.reset();                           # Reset the data selection
fg.setids(fieldid=3);                 # Limit quack to fieldid=3 only
fg.quack(scaninterval='30s',          # Trial run of quack
         delta='20s',
         trial=T);
fg.quack(scaninterval='30s',          # Quack it
         delta='20s');
Where the first execution of the quack function was a trial
run to see exactly how much data would be flagged. The second run with
TRIAL=F actually 'quacked' the data.
Example 8:
To clip data in field 2 and spectral windows 1 & 2,
outside of a specified amplitude range of 1.12-1.34 Jy you would do
the following:
fg.setids(fieldid=2, spwid=[1,2]);    # Select field, spw
fg.setpol(pol=[1,4]);                 # Select polarizations 1,4
                                      #  (e.g., RR and LL)
fg.filter(column='DATA',              # Flag data if, DATA column
          operation='range',          #   Amplitudes are outside of
          comparison='Amplitude',     #   the range 1.12-1.34 Jy.
          range=['1.12Jy','1.34Jy'],
          fullpol=T,                  # Extend flags to pols that
          fullchan=T);                #  weren't tested by the filter
                                      #  and flag all channels in a
                                      #  uv data point if any channels
                                      #  are outside the amp range.
fg.done();                            # Finish the flagger tool.
In this example, the setids and setpol functions select
the data that will be tested. The filter tests to see whether
the selected data (the observed DATA column) is within the specified
range, if it is not, then the data is flagged. The range here is
applicable to the RR & LL polarizations (pols 1 & 4). But, if the
RR & LL polarizations are bad, it is a good idea to flag the
cross-polarizations, RL & LR. This is done by setting FULLPOL=T to flag this data even though it wasn't tested by the
filter function. The choice of FULLCHAN=T specifies
that, if this is channel data and one channel fails the test, then all
channels in that uv data point will be flagged.
When solving for visibility-plane calibration components, the calibrater tool compares the observed DATA column with the MODEL_DATA column. The first time that an imager or calibrater tool is constructed for a given MS, the MODEL_DATA column is created and initialized with unit point source flux density visibilities (unpolarized) for all sources (e.g. AMP=1, phase=0o). The Imager.setjy function is then used to set the proper flux density for flux density calibrators. For sources that are recognized flux density calibrators (listed in Table 1.3), Imager.setjy will calculate the flux densities, Fourier transform the data and write the results to the MODEL_DATA column. For the VLA, the default source models are customarily point sources defined by the Baars or Perley-Taylor flux density scales, or point sources of unit flux density if the flux density is unknown. The MODEL_DATA column can also be filled with a model generated from an image of the source (e.g. the Fourier transform of an image generated after initial calibration of the data).
First, set the flux density for 3C 286 (FIELD_ID 11) according to
Perley-Taylor (1999):
imgrC:=imager(filename='ap366.ms'); # Start the imager tool
imgrC.setjy(fieldid=11);            # Calculate & set flux density for
                                    #  1328+307 (3C 286) to 7.462Jy
After running setjy you will get a report in the logger giving
the status of the task along with the end results:
  Starting imager::setjy
    1328+307  spwid=  1  [I=7.462, Q=0, U=0, V=0] Jy, (Perley-Taylor 99)
  Finished imager::setjy
Check that the flux is actually set by using the imager.plotvis function to see the value in the MODEL_DATA column. First select only the 3C 286 data using the imager.setdata function, then run plotvis to create Fig 1.10:
imgrC.setdata(fieldid=11);          # Setdata to 1328+307 (3C 286)
imgrC.plotvis(type='model');        # Plot model amplitudes vs uv distance
imgrC.done();                       # Close out the tool.
Set the flux density of 3C 286 (field 1):
imgrS:=imager(filename='ngc5921.ms'); # Start the imager tool
imgrS.setjy(fieldid=1);               # Calculate & set flux density for
                                      #  1328+307 (3C 286) to 14.76 Jy
After setjy is run you will get a report in the logger giving
the status of the task along with the end results:
  Starting imager::setjy
    1331+30500002  spwid=  1  [I=14.76, Q=0, U=0, V=0] Jy, (Perley-Taylor 99)
  Finished imager::setjy
Check that the flux is actually set by using imgrS.plotvis
(Fig. 1.10):
imgrS.setdata(fieldid=1);             # Setdata to 1331+305 (3C 286)
imgrS.plotvis(type='model');          # Plot model amplitudes vs uv distance
imgrC.done();                         # Close out the tool.
At this point, the source model and observed data exist for all calibrators at all uv-points, and it is possible to begin solving for the gains. It is almost invariably the case that the instrumental and atmospheric amplitude and phase gains (hereafter ``complex gains'') are the dominant calibration error in VLA data. Therefore we solve for this factor first.
For the standard cross-calibration scheme described here, only one term (G) will be used to describe the net complex gain (and so it will include atmospheric effects). One complex gain factor, as a function of time, will be determined for each field, spectral window, polarization, and antenna in the dataset.
Note: Well-behaved antennas that are located near the center of the array are chosen as reference antennas for each dataset. For non-polarization datasets, reference antennas need not be specified although you can if you want to. If no reference antenna is specified, an effective phase reference that is an average over the data will be calculated and used. For data that requires polarization calibration, you must choose a reference antenna that has a constant phase difference between the right and left polarizations (i.e., no phase jumps or drifts). If no reference antenna (or a poor one) is specified, the phase reference may have jumps in the R-L phase, and the resulting polarization position angle response will vary during the observation, thus corrupting the polarization imaging.
To solve for G, first choose a solution interval which samples the time scale over which you think the instrument or atmosphere is changing. Time scales depend on the array configuration and the observed frequency. Here, a time scale of 60 sec is chosen for the 6 cm continuum polarimetry data while scan-based solutions (one solution per integration) are chosen for the 21 cm spectral line data.
To obtain gain calibration solutions for the continuum polarimetry
data set, create the calibrator tool, select which data you want to
find solutions for (e.g. the gain and flux calibrators in FIELD_IDs 9
& 11), set up to apply pre-computed polarization calibration, set up
to solve for phase and amplitude solutions, and then solve for the
calibration solutions. The actual solutions will be written to a file
(here called ap366.gcal) that will be written to disk. The dataset
itself will not be written to at this point. Thus:
calC:=calibrater(filename='ap366.ms');      # Create Calibrater tool

calC.setdata(msselect='FIELD_ID IN [9,11]');
                                            # Select calibrator sources
                                            #  in MS fields 9 & 11
calC.setapply(type='P',                     # Arrange to apply parallactic
              t=5.0);                       #  angle correction (for polarization
                                            #  only).  Choose a 5 sec timescale.
                                            #  The P-table corrections are
                                            #  computed in AIPS++.
calC.setsolve(type='G',                     # Arrange to solve for G
              t=60.0,                       #  on a 60.0 sec timescale
              refant=4,                     #  Choose reference antenna 4,
              table='ap366.gcal');          #  a well-behaved antenna
                                            #  near the center of the array.
calC.state();                               # Review setapply/setsolve settings
calC.solve();                               # Solve for the net complex gains
                                            #  and write solutions to the table
                                            #  ap366.gcal located on disk.
calC.plotcal(tablename='ap366.gcal');       # Inspect solutions
The state function provides the current state of the calibrator tool
in a logger message:
  The following calibration components will be applied:
    P table=<pre-computed> t=5 select=[]
  The following calibration components will be solved for:
    G table=ap366.gcal t=60 preavg=0 phaseonly=F refant=4 append=F
While the calibrater.solve function is running, the logger will report
the status of the convergence with messages like:
  G Jones Slot=1, 0917+624, spw=1: 22-May-1998/22:40:05 to 22-May-1998/22:41:00
  G Jones    Initial fit per unit weight = 0.989737 Jy, sum of weights = 6210
  G Jones    Final   fit per unit weight = 0.013267 Jy after 7 iterations
  G Jones Slot=10, 1328+307, spw=1: 23-May-1998/00:53:15 to 23-May-1998/00:53:55
  G Jones    Initial fit per unit weight = 7.41213 Jy, sum of weights = 4920
  G Jones    Final   fit per unit weight = 0.0821705 Jy after 7 iterations
Good solutions will have a final fit per unit weight that is a few percent of the initial fit per unit weight, as shown above. You can plot the solutions graphically using the calibrater.plotcal function, e.g. (Fig. 1.11):
Note that all calibrater.setapply and calibrater.setsolve executions prior to the calibrater.solve execution will be in effect when obtaining the solutions. Thus, the parallactic angle correction, P, is applied before the G solutions are obtained. The parallactic angle correction is required for polarimetry reduction, and may be omitted otherwise. If data imported from AIPS already had the parallactic angle correction applied using the AIPS task CLCOR, then the calibrater.setapply step for P should be omitted (it is the user's responsibility to keep track of this).
If your calibration solutions do not converge well, try longer
solution intervals. You may also have bad data remaining in the
calibrators: take a closer look at your data and flag anything that
looks suspect.
NOTE: To specify scan-based solutions (e.g. determine gain solutions for each scan) set t=0.0 in calC.setsolve.
To obtain gain calibration solutions for the spectral-line data set:
select the data you want to find solutions for (the inner 55 channels,
starting at channel 3, for the gain and flux calibrators in FIELD_IDs
1 & 2), set up to derive scan-based solutions for phase and
amplitude, and then solve for the calibration solutions. Write the
gain solutions to a file called ngc5921.gcal and plot the solutions:
calS:=calibrater(filename='ngc5921.ms'); # Create calibrater tool for
                                         #  spectral line data set
calS.setdata(msselect='FIELD_ID <= 2',   # Select data for calibrators
             mode='channel',             #  (Fields 1 & 2)
             start=3,                    #  and drop the outer channels
             nchan=55);                  #  that may bias the gain solution.
calS.setsolve(type='G',                  # Arrange to solve for G for
              t=0,                       #  each integration.
              refant=14,                 #  Choose reference antenna 14:
              table='ngc5921.gcal');     #  a well-behaved antenna
                                         #  near the center of the array.
calS.state();                            # Review setsolve settings
calS.solve();                            # Solve for the net complex gains
                                         #  and write solutions to the table
                                         #  ngc5921.gcal located on disk.
calS.plotcal(tablename='ngc5921.gcal');  # Inspect solutions
Note that we have omitted application of P since there is no
polarization data. The state function provides the current state of
the calibrator tool in a logger message:
  The following calibration components will be applied:
    None.
  The following calibration components will be solved for:
    G table=ngc5921.gcal t=0 preavg=0 phaseonly=F refant=14 append=F
While the calibrater.solve function is running, the logger will report
the status of the convergence with messages like:
  G Jones Slot=1, 1331+30500002, spw=1: 13-Apr-1995/09:19:00 to 13-Apr-1995/09:24:30
  G Jones    Initial fit per unit weight = 1.94099 Jy, sum of weights = 6.32923e+06
  G Jones    Final   fit per unit weight = 0.0274396 Jy after 8 iterations
  G Jones Slot=2, 1445+09900002, spw=1: 13-Apr-1995/09:27:30 to 13-Apr-1995/09:29:30
  G Jones    Initial fit per unit weight = 0.324512 Jy, sum of weights = 2.65356e+06
  G Jones    Final   fit per unit weight = 0.00756852 Jy after 8 iterations
Good solutions will have a final fit per unit weight that is a few percent of the initial fit per unit weight, as shown above. You can plot the solutions graphically using the calibrater.plotcal function, e.g. (Fig. 1.12). If you want solutions plotted for each antenna separately, choose MULTIPLOT=True.
As illustrated above, the calibrater tool has three `set' functions (calibrater.setdata, calibrater.setapply, and calibrater.setsolve) and two `operational' functions (calibrater.solve and calibrater.correct). The calibrater.setdata function selects data and the calibrater.setapply and calibrater.setsolve functions set up the state of the calibrater tool. Both calibrater.setapply and calibrater.setsolve can be executed more than once (for different calibration components) prior to calibrater.solve or calibrater.correct (e.g., calibrater.setapply will typically be executed for both G and P before solving for D). Use the calibrater.state function to review the current state and the calibrater.reset function to clear all or part of the calibrater.setapply/calibrater.setsolve state.
The calibrater.solve function will apply the calibration components (specified with calibrater.setapply) to the observed DATA, and solve for the components specified with calibrater.setsolve. Note that it is possible to specify more than one component for solving. In this case, the solutions are done serially (not simultaneously) in the right-to-left order prescribed by the Measurement Equation formalism (e.g., G before D), with each newly-solved component applied before solving for the next (e.g., G solutions will be applied before solving for D).
The calibrater.correct function applies a set of calibrations to the observed data and saves it for imaging in the CORRECTED_DATA column of the MeasurementSet. Anything set by calibrater.setsolve is ignored by calibrater.correct.
In the case of spectral-line data, it is necessary to remove gain fluctuations that are a function of frequency. This is achieved by using the calibrater tool to solve for B calibration, in the present example, using 1331-305 as the bandpass calibrator. The G calibration obtained above is applied to ensure that the B calibration will be normalized. The solution interval is set very large so only one B solution (in time) is obtained.
To obtain bandpass solutions for the spectral-line data set: select
the data you want to find solutions for (the bandpass calibrator in
FIELD_ID 1), reset the calibrator tool, set up to derive a single
solution for phase and amplitude, and then solve. Write the bandpass
solutions to a file called ngc5921.bcal and plot the solutions:
calS.setdata(msselect='FIELD_ID==1');     # Select bandpass calibrator
                                          #  (1331+305 = 3C 286)
calS.reset();                             # Reset apply/solve state
                                          #  of the calibrater tool
calS.setapply(type='G',                   # Arrange to apply G solutions
              t=0.0,                      #  from the table ngc5921.gcal
              table='ngc5921.gcal');
calS.setsolve(type='B',                   # Arrange to solve for a single
              t=86400.0,                  #  bandpass solution for the
              refant=14,                  #  entire observation.
              table='ngc5921.bcal');
calS.state();                             # Review setapply/setsolve settings
calS.solve();                             # Solve for the bandpass solutions
                                          #  and write them to the table
                                          #  ngc5921.bcal located on disk.
calS.plotcal(tablename='ngc5921.bcal',    # Inspect the solutions
             plottype='AMP',
             multiplot=F);
The state function provides the current state of the calibrator tool
in a logger message:
  The following calibration components will be applied:
    G table=ngc5921.gcal t=0 select=[]
  The following calibration components will be solved for:
    B table=ngc5921.bcal t=86400 preavg=0 phaseonly=F refant=14 append=F
While the calibrater.solve function is running, the logger will report
the status of the convergence:
  Initializing solvable bandpass terms (B-matrix)
  For interval of 86400 seconds, found 1 slots
  Applying G table from ngc5921.gcal
  Solving for B
  B Jones Slot=1, 1331+30500002, spw=1: 13-Apr-1995/09:19:00 to 13-Apr-1995/09:24:30
  B Jones    Initial fit per unit weight = 0.398437 Jy, sum of weights = 3.99722e+08
  B Jones    Final   fit per unit weight = 0.0425429 Jy after 6 iterations
  Storing B matrix in table ngc5921.bcal
As with the gain calibration, good solutions have a final fit per unit weight that is low relative to the initial fit per unit weight, as shown above. Plot the solutions graphically using the calibrater.plotcal function (Fig. 1.13):
For point sources of unknown flux density, but for which valid solutions have been derived against a unit point source model, the absolute flux density can be established by scaling the mean gain amplitudes against those of the known amplitude calibrators. This scaling is achieved using the calibrater.fluxscale function.
In both examples below, the amplitude scale is set with 3C286 as the
reference flux density calibrator. The output calibration table
contains the scaled G calibration factors for all of the transfer
sources, and will be used in subsequent reduction steps. Proper
scaling is indicated in the calibrater.plotcal plots by smoothly varying
(ideally constant) amplitude gains for each antenna, despite
source changes. At high frequencies (![]() > 15 GHz), this scaling
step may be biased by elevation-dependent variation of the atmospheric
contribution to the system noise temperature. Methods for treating
this case properly will be available in the near future.
> 15 GHz), this scaling
step may be biased by elevation-dependent variation of the atmospheric
contribution to the system noise temperature. Methods for treating
this case properly will be available in the near future.
In the calibrater tool, transfer the flux scale
calculated for 3C 286 to the gain calibrator, 0917+624, and write the
scaled solutions to a file on disk called ap366.fluxcal. Plot the
solutions with the plotcal function (Fig. 1.14):
calC.fluxscale(tablein='ap366.gcal',      # Transfer the flux density scale
               tableout='ap366.fluxcal',  #  from 1328+307 (B1950: 3C286)
               reference='1328+307',      #  to the gain calibrator 0917+642.
               transfer='0917+624');      #  Write solutions to ap366.fluxcal.
calC.plotcal(tablename='ap366.fluxcal',  # Inspect the solutions
             plottype='AMP',
             multiplot=F);
The logger window will report the flux density of the gain calibrator:
  Setting the flux density scale using reference calibrators
  Flux density for 0917+624 (spw=1) is:     1.482 +/-  0.001 Jy
In the calibrater tool, transfer the flux scale
calculated for 3C 286 to the gain calibrator, 1445+099, and write the
scaled solutions to a file on disk called ngc5921.fluxcal. Plot the
solutions with the plotcal function (Fig. 1.15):
calS.fluxscale(tablein='ngc5921.gcal',        # Transfer the flux density scale
               tableout='ngc5921.fluxcal',    #  from 1328+307 (J2000: 3C286)
               reference='1331+30500002',     #  to the gain calibrator
               transfer=['1445+09900002']);   #  1445+09900002.  Write
                                              #  solutions to the table
                                              #  ngc5921.fluxcal located on disk.
calS.plotcal(tablename='ngc5921.fluxcal',     # Inspect the solutions
             plottype='AMP',
             multiplot=F);
The logger window will report the flux density of the gain calibrator:
  Setting the flux density scale using reference calibrators
  Flux density for 1445+09900002 (spw=1) is:     2.486 +/-  0.000 Jy
Before imaging, the data need to be corrected by applying the calibrations determined above. The calibrater.setdata function selects which data are to be corrected, and the calibrater.setapply function selects which solutions are to be applied. The calibrater.setapply function may be run several times (in any order) to specify simultaneous application of different calibration components. The components will be applied by the calibrater.correct function in the appropriate order according to the Measurement Equation. In AIPS++, calibration tables are always cumulative, and so are always applied to the observed data in the DATA column. The corrected data are written to the CORRECTED_DATA column in the MS, which will be used directly in imaging. Note: the observed DATA is NOT changed. If you want to change the solutions you have applied, you can create new calibration tables and correct the data again - the CORRECTED_DATA column will be over-written.
In the calibrater tool, select all data: source, gain and flux
calibrators (Fields 9, 10, & 11), reset the tool state, set up to
apply parallactic angle and flux-scaled gain solutions, and then
correct the observed data, writing the result to the CORRECTED_DATA
column in the measurement set:
calC.setdata(msselect='FIELD_ID IN [9:11]');  # Select sources in MS fields
                                              #  9, 10 & 11 to which calibration
                                              #  is to be applied
calC.reset();                                 # Reset setapply/setsolve
calC.setapply(type='P',                       # Arrange to apply parallactic angle
              t=5.0);                         #  correction on 5 sec intervals
calC.setapply(type='G',                       # Arrange to apply flux-scaled G
              t=0.0,                          #  solutions from the ap366.fluxcal
              table='ap366.fluxcal');         #  table.
calC.state();                                 # Review setapply settings
calC.correct();                               # Apply solutions and write the
                                              #  CORRECTED_DATA column in the MS.
The calibrator.state and calibrator.correct functions will
produce the logger messages:
  The following calibration components will be applied:
    G table=ap366.fluxcal t=0 select=[]
    P table=<pre-computed> t=5.0 select=[]
  The following calibration components will be solved for:
    None.
  Initializing non-solvable parallactic angle (P-matrix)
  For interval of 5 seconds, found 213 slots
  Applying G table from ap366.fluxcal
At this point, it is a good idea to examine the calibrated source data
(CORRECTED_DATA column) with msplot and flag any bad data.
The continuum data set doesn't have any bad source data so this step
will be skipped.
In the calibrater tool, select source & gain calibrators
(Fields 2 & 3), reset the tool state, set up to apply flux-scaled
gain solutions derived from the gain calibrator (Field 2) along with
the bandpass solutions, and then correct the observed data, writing
the result to the CORRECTED_DATA column in the measurement set:
calS.setdata(msselect='FIELD_ID IN [2,3]');  # Select sources in MS fields
                                             #  2, & 3 to which calibration
                                             #  is to be applied
calS.reset();                                # Reset setapply/setsolve
calS.setapply(type='G',                      # Arrange to apply flux-scaled G
              t=0.0,                         #  solutions (from field 2) from
              table='ngc5921.fluxcal',       #  the ngc5921.fluxcal table.
              select='FIELD_ID==2');
calS.setapply(type='B',                      # Arrange to apply B solutions
              t=0.0,                         #  from the ngc5921.bcal table.
              table='ngc5921.bcal',
              select='');
calS.state();                                # Review setapply settings
calS.correct();                              # Apply solutions and write the
                                             #  CORRECTED_DATA column in the MS.
The calibrator.state and calibrator.correct functions will
produce the logger messages:
  The following calibration components will be applied:
    B table=ngc5921.bcal t=0 select=[]
    G table=ngc5921.fluxcal t=0 select=[(FIELD_ID+1)==2]
  The following calibration components will be solved for:
    None.
  Applying B table from ngc5921.bcal
  Applying G table from ngc5921.fluxcal
At this point, it is a good idea to examine the calibrated source data (CORRECTED_DATA column) with msplot and flag any bad data. The spectral line data set doesn't have any bad source data so this step will be skipped.
Note: The flux calibrator (3C 286, FIELD_ID 1) could have been calibrated at the same time by selecting it in the initial calS.setdata and applying the G and B solutions to all the data (as in the previous example with the continuum data set). To calibrate the 3C 286 data separately, execute calS.setdata and calS.setapply(type=G) again with FIELD_ID==1 selected in both, followed by calS.correct.
For the continuum polarimetry data set, it is necessary to calibrate
the instrumental polarization (D) before high-quality polarization
images can be formed. Accurate D calibration depends on an
appropriate polarization model for the calibrator. If the calibrator
is unpolarized (Stokes Q = U ![]() 0), and
point-like1.2, the simple total
intensity model (non-zero Stokes I only) used in the G calibration
can be used as a polarization model. If this is the case, the D
calibration can be obtained at the same time as G by issuing an
additional calC.setsolve execution before the calC.solve
is executed.
0), and
point-like1.2, the simple total
intensity model (non-zero Stokes I only) used in the G calibration
can be used as a polarization model. If this is the case, the D
calibration can be obtained at the same time as G by issuing an
additional calC.setsolve execution before the calC.solve
is executed.
If the instrumental polarization calibrator is significantly polarized (as in the case of 3C 286) a non-zero model for Stokes Q and U must be determined. This model can be obtained by imaging the full polarization image prior to D calibration, as described below. In the near future, a function for simply summing the polarization visibilities will be available to provide an initial polarization model estimate.
For the time being, the polarization model of 3C 286 is obtained by imaging the corrected data after applying the G (and P) calibration. Since 3C 286 is virtually a point source at this frequency, the Stokes I, Q, and U values are obtained using the image.statistics function in the image tool.
The calibrater tool operations used in solving for D are similar to those used to solve for G. However, note that one additional parameter--preavg--is used explicitly in the calibrater.setsolve execution. Since only one D solution is desired for the entire observation, the solution interval is set very long, and the data for each baseline within the solution interval would be averaged before the solution is determined. However, the parallactic angle varies on timescales much shorter than the solution interval1.3. Thus, the preavg parameter is set to prevent averaging of the data beyond an acceptable timescale for the parallactic angle.
First make IQUV images of the polarization calibrator 3C 286 to
determine the polarization model (a more detailed description of
imaging is given in the next section). First, start the imager tool
and click on the Function Group button to the left of the GUI.
Choose the option ALL function groups so you can see all
possible functions available within the imager tool. Then
select the 3C 286 data, define the image characteristics and weighting
scheme. Finally, make a simple, un-CLEANED image called 3c286.cal1.im
and write it to disk:
imgrC:=imager(filename='ap366.ms');          # Start the imager tool
imgrC.setdata(mode='none',                   # Select continuum data for
              fieldid=11);                   #  for 3C 286.
imgrC.setimage(nx=512,                       # Set up imaging parameters.
               ny=512,
               cellx='0.1arcsec',
               celly='0.1arcsec',
               stokes='IQUV',
               fieldid=11);
imgrC.weight(type='uniform');                # Choose weighting
                                             #  e.g. uniform, natural.
imgrC.makeimage(type='corrected',            # Make an image using the
                image='3c286cal1.im');       #  CORRECTED_DATA column
                                             #  in the MS.  Write the image
                                             #  3c286cal1.im to disk.
The resulting image, 3c286cal.im, written to disk, has 4 planes, with
I, Q, U, and V images. Use the viewer to obtain statistics on
each plane of the IQUV image (see the Image Analysis section of this
document for details about Viewer operation). Very briefly, bring up
the image with the viewer by left-clicking on the wrench icon to
the right of the image name in the GUI input, and choosing the option
View. Once the viewer window comes up, use the arrow
buttons on the right of the viewer to display the Q image (2nd
image plane). Then, left-click on the Tools button at the top
of the viewer and choose the ImageStatistics option to
bring up an Image Statistics GUI. Click on the Statistics
option in this GUI. To obtain statistics in the 2nd image plane,
left-click on the Plane button.
Record the maximum OR minimum value, which ever has the largest
absolute value. Use the viewer arrow buttons to display the U image
and repeat this procedure. Now, using the Stokes I value reported by the
Imager.setjy function run earlier and assuming V=0, the final
polarization model is:
I = 7.462 Q = 0.4982 U = -0.6988 V = 0
If your data set has two spectral windows, create an image with spwid=2 and repeat this procedure to find I, Q, and U.
Now, set the flux density model of 3C 286 with imager.setjy and
proceed to the calibrator tool to solve for the polarization
``leakage'' terms (aka D-terms):
stokes := [7.462, 0.4982, -0.6988, 0.0]      # Define polarization model
                                             #  determined from imaging
imgrC.setjy(fieldid=11,                      # Set model for IQUV
            fluxdensity=stokes);

calC.setdata(msselect='FIELD_ID==11');       # Select data for polarization
                                             #  calibrator, 3C286
calC.reset();                                # Reset setapply/setsolve
calC.setapply(type='P',                      # Arrange to apply parallactic angle
              t=5.0);                        #  correction
calC.setapply(type='G',                      # Arrange to apply flux-scaled
              t=0.0,                         #  G solutions
              table='ap366.fluxcal');
calC.setsolve(type='D',                      # Arrange to solve for D over a long
              t=86400.0,                     #  time scale, average data within
              preavg=600.0,                  #  the solution to no more than 600
              table='ap366.dcal');           #  sec per chunk.
                                             #  Write the solutions to the table
                                             #  ap366.dcal located on disk.
calC.state();                                # Review setapply/setsolve settings
calC.solve();                                # Solve
calC.plotcal(plottype="DRI" ,                # Examine solutions
             tablename="ap366.dcal");
The calibrator.state and calibrator.solve functions will produce the logger messages:
  The following calibration components will be applied:
    G table=ap366.fluxcal t=0 select=[]
    P table=<pre-computed> t=5 select=[]
  The following calibration components will be solved for:
    D table=ap366.dcal t=86400 preavg=600 phaseonly=F refant=4 append=F
  Solving for D
  D Jones Slot=1, 1328+307, spw=1: 23-May-1998/00:53:15 to 23-May-1998/04:45:40
  D Jones    Initial fit per unit weight = 0.191679 Jy, sum of weights = 25290
  D Jones    Final   fit per unit weight = 0.13899 Jy after 8 iterations
  Storing D matrix in table ap366.dcal
The D-term solutions (Fig. 1.16) are plotted with PLOTTYPE=DRI: D-term real versus imaginary components. Most
solutions are less than 1% except for a few antennas with about 3%
leakage. This is a reasonable solution. See:
http://www.aoc.nrao.edu/![]() gtaylor/calman/polcal.html
for a detailed description on how to plan for good polarization
calibration and what to expect when solving for D-terms.
gtaylor/calman/polcal.html
for a detailed description on how to plan for good polarization
calibration and what to expect when solving for D-terms.
Now, correct the data for P, G and D as follows:
calC.setdata(msselect='FIELD_ID IN [9:11]'); # Select fields 9, 10, & 11 to
                                             #  which calibration will be applied:
                                             #  9  = gain calibrator 0917+642
                                             #  10 = target source 0957+561
                                             #  11 = polarization cal 3C 286
calC.reset();                                # Reset setapply/setsolve
calC.setapply(type='P',                      # Arrange to apply parallactic
              t=5.0);                        #  angle correction
calC.setapply(type='G',                      # Arrange to apply flux-scaled
              t=0.0,                         #  G solutions
              table='ap366.fluxcal');
calC.setapply(type='D',                      # Arrange to apply D solutions
              t=0.0,
              table='ap366.dcal');
calC.state();                                # review setapply settings
calC.correct()                               # Write the corrected the data
                                             #  to the CORRECTED_DATA column
                                             #  in the MS
The calC.state and calC.correct functions will report in the logger window:
  The following calibration components will be applied:
    D table=ap366.dcal t=0 select=[]
    G table=ap366.fluxcal t=0 select=[]
    P table=<pre-computed> t=5 select=[]
  The following calibration components will be solved for:
    None.
  Initializing non-solvable parallactic angle (P-matrix)
  For interval of 5 seconds, found 213 slots
  Applying G table from ap366.fluxcal
  Applying D table from ap366.dcal
Polarization calibration is almost complete at this point - the final step, calibrating the electric vector position angle, will be done during the imaging steps below.
This section describes single-field imaging/deconvolution for the continuum and spectral-line datasets as well as how to interactively define a CLEAN region.
There are almost as many ways to deconvolve an image as there are radio astronomers. The examples given in this section illustrate two relatively simple ways to create images. They have been designed to step the beginning user through the imaging process without getting bogged down with too many details. For an in depth discussion about imaging strategies and the imager arguments see the web documentation at synthesis imaging and imager.
For the continuum data set, make a single-field, full-polarization (I,
Q, U, & V), continuum image of the target source, 0957+561 (Field
10), using the Clark CLEAN deconvolution algorithm. To do this,
first, set which source you want to image, use the imager.advise function to get an estimate of what the image properties should be,
then set the image parameters and weight:
imgrC:=imager(filename='ap366.ms');  # Create imager tool if not already done.
imgrC.setdata(mode='none',           # Select continuum data for the target
              fieldid=10);           #  source in field 10 (0957+561)
imgrC.advise(takeadvice=F,           # Determine image and cell size using
             fieldofview='1arcmin'); #  advise function.  Do not take advice,
                                     #  note parameters in logger
                                     #  window and use as a basis for setimage.
The Advice function will produce logger messages which you can use to guide your choice of image properties:
  Advising image properties
  Maximum uv distance = 585844 wavelengths
  Recommended cell size < 0.176041 arcsec
  Recommended number of pixels = 360
  Dispersion in uv, w distance = 243745, 81981.6 wavelengths
  Best fitting plane is w = 0.345636 * u + 0.345275 * v
  Dispersion in fitted w = 24694.9 wavelengths
  Wide field cleaning is not necessary
Set the image parameters and weights:
imgrC.setimage(nx=512,               # Set image plane parameters
               ny=512,
               cellx='0.1arcsec',
               celly='0.1arcsec',
               stokes='IQUV',        #   (full polarization)
               fieldid=10);
imgrC.weight(type='uniform');        # Set uniform weighting
At this point, you can examine the synthesized beam or Point Spread
Function to determine the resolution resulting from the chosen
weighting scheme and see what artifacts to expect from beam sidelobes
during CLEANing (Fig. 1.17) (Note: this is not a required
step to produce an image):
imgrC.makeimage(type='psf',          # Form the PSF image if desired
              image='0957+561.psf'); #  use viewer to see sidelobe response

imgrC.fitpsf(psf='0957+561.psf');    # Measure the beam size
The imgrC.fitpsf function will report the FWHM of the synthesized beam in the logger:
Beam fit: 0.423026 by 0.335217 (arcsec) at pa 30.068 (deg)
CLEAN the image by first creating a dirty image first, define a mask
around obvious source structure, clean for a number of iterations, and
redefine the mask until you have all obvious source emission within
the masked region. Then continue to clean until you have reached the
noise level:
imgrC.clean(algorithm='clark',       # Image, and deconvolve using
            niter=5000,              #  the Clark CLEAN
            gain=0.1,                #  Write the cleaned image to the file
            model='0957+561.mod',    #  0957+561.im on disk.
            image='0957+561.im',
            residual='0957+561.resid',
            mask='0957+561.mask',    # Clean mask file name.
            interactive=T,           # Clean interactively, with the option
            npercycle=500);          #  to choose a new clean region every
                                     #  500 cleaning cycles.  Stop cleaning when
                                     #  you have reached desired level.
dv.gui();                            # Bring up default viewer tool to
                                     #  examine final image.
During the CLEAN run, you will be asked to interactively define CLEAN regions (polygons or boxes) in a pop-up viewer. Details about how to do this is described in Section 1.12.3. Interactive masking allows you to add and subtract multiple polygon structures to create a mask around complex source structure. Fig. 1.18 shows an example of the interactive mask GUI interface that pops up during the CLEANing cycle.
Use the viewer to display the image 0957+561.im and obtain
statistics (Fig. 1.19). The final image should have an RMS
![]() 0.45 mJy beam-1 and an image peak
0.45 mJy beam-1 and an image peak ![]() 26.3 mJy beam-1.
26.3 mJy beam-1.
Note that the CLEAN component model is written as an image file. If necessary or desired, CLEANing may be restarted by specifying an existing (non-zero) model image, which will be subtracted before the deconvolution is resumed. This provides a simple means of monitoring progress of the deconvolution outside of the interactive mode. Note that the imager.setdata and imager.setimage functions need not be run again when restarting a CLEAN with the previously setup imager tool.
For the spectral-line data set, total intensity images of the HI in the galaxy NGC 5921 are generated for each channel to form a spectral-line cube. In this example, the CLEANing process is done on the line+continuum data and then the continuum is subtracted in the image plane.
Cleaning a spectral-line cube with the continuum in each channel can be inefficient if most of the clean cycles are spent cleaning the same structure (e.g. continuum emission) in each plane. Thus, it is sometimes better to subtract the continuum emission before the CLEAN process. A Glish script along with a description of how to do continuum subtraction in the uv plane, before imaging, will be available soon.
CLEANing a cube is similar to CLEANing a single continuum channel
except that a mask can be defined for each channel. The mask can be a
single shape that is defined for all channels (e.g. as in the
continuum polarimetry example) or it can have a variable shape
depending upon the location of the emission in each channel. In the
simple example below, the image data, parameters, and weighting
function are defined first. The inner quarter of the cube (continuum
+ line emission) is then CLEANed for 3000 iterations:
imgrS:=imager(filename='ngc5921.ms');# Create imager tool if not already done.
imgrS.setdata(mode='channel',        # Select channel data for field 3
              nchan=60,
              start=3,
              step=1,
              fieldid=3);
imgrS.advise(takeadvice=F,           # Determine image and cell size using
            fieldofview='60arcmin'); #  advise function.  Do not take advice,
                                     #  note parameters in logger
                                     #  window and use for setimage.
The Advice function will produce logger messages which you can use to guide your choice of image properties:
  Advising image properties
  Maximum uv distance = 4798.32 wavelengths
  Recommended cell size < 21.4934 arcsec
  Recommended number of pixels = 180
  Dispersion in uv, w distance = 1928.57, 788.584 wavelengths
  Best fitting plane is w = -0.253496 * u + -0.574818 * v
  Dispersion in fitted w = 178.7 wavelengths
  Wide field cleaning is not necessary
Set the image parameters and weights:
imgrS.setimage(nx=256,               # Imaging parameters
               ny=256,
               cellx='15arcsec',
               celly='15arcsec',
               stokes='I',
               mode='channel',
               nchan=60,
               start=3,
               step=1,
               fieldid=3);
imgrS.weight(type='briggs',          # Robust weighting
             rmode='norm',
             robust=0.5);
To examine the synthesized beam or Point Spread
Function to determine the resolution resulting from the chosen
weighting scheme and see what artifacts to expect from beam sidelobes
during CLEANing (Fig. 1.20):
imgrS.makeimage(type='psf',          # Form the PSF image if desired
                image='ngc5921.psf');
imgrS.fitpsf(psf='ngc5921.psf');     # Measure the beam size
The imgrS.fitpsf function will report the FWHM of the
synthesized beam in the logger:
Beam fit: 53.2801 by 45.8792 (arcsec) at pa -164.714 (deg)
To Hogbom CLEAN the inner quarter of the image down to a threshold
level of about the expected RMS level in a single channel (2 mJy):
imgrS.clean(algorithm='hogbom',      # Image and deconvolve inner quarter
            niter=6000,              #  with Hogbom CLEAN down to a threshold
            gain=0.1,                #  of 2 mJy
            threshold='2mJy',
            model='ngc5921.mod',
            image='ngc5921.im',      #  Write the cleaned image to the file
            residual='ngc5921.resid');#  ngc5921.im on disk.
dv.gui();                            # Bring up default viewer tool to
                                     #  examine final image.
Use the viewer to display the image ngc5921.im and obtain
statistics (Fig. 1.21). The final image should have a
peak of ![]() 89.2 mJy beam-1 and an RMS
89.2 mJy beam-1 and an RMS ![]() 1.3 mJy beam-1 in each channel. You should see several
continuum sources and the HI emission in the galaxy as you move
through the cube.
1.3 mJy beam-1 in each channel. You should see several
continuum sources and the HI emission in the galaxy as you move
through the cube.
Note: at this time, if you want to interactively define the CLEAN region or mask and then CLEAN down to a specified threshold level without continuing to set or change the mask, run CLEAN with niter set to a small number and interactive=T to define the mask. Then re-start CLEAN with niter set to a large number, threshold set to the level you want, mask set to your newly made mask, and interactive=F.
If you have sufficient signal-to-noise on your target source or any source in the field, then you may now use the calibrater tool to improve the dynamic range of your images. This improved calibration or "self-calibration" technique assumes that your images have been degraded by complex gain errors which vary too rapidly with time or direction to have been fully calibrated with the calibrator sources. The calibrater tool compares the observed uv DATA with a model of the data that you created during the initial CLEANing and determines amplitude and/or phase corrections which bring the CORRECTED_DATA into better agreement with the model.
Do not self-calibrate unless your target source has enough signal-to-noise to warrant improvement. Ask yourself whether your externally-calibrated CLEAN images contain artifacts well above the noise. If so, self-calibration may improve the image. If your images are limited by system noise, self-calibration may produce erroneous results, including the fabrication of weak sources!
First, create the imager tool if it is not already created. Then,
fill the MODEL_DATA column in the MS for the target source using the
output model from the last execution of imager.clean:
imgrC.setdata(mode='none',             # Select continuum data for the target
              fieldid=10);             #  source in field 10 (0957+561)
imgrC.ft(model='0957+561.mod');        # Fill MODEL_DATA column in the MS
Now it is possible to determine new and improved calibration
solutions. We want an incremental solution over the current G, so
do an ``atmospheric phase'' or T calibration (phase only,
polarization-independent solutions):
calC.setdata(msselect='FIELD_ID==10'); # Set data for target source
calC.reset();                          # Reset apply/solve state
calC.setapply(type='P',                # Arrange to apply P corrections
              t=5.0);
calC.setapply(type="G",                # Arrange to apply flux-scaled
              t=0,                     #  G solutions
              table="ap366.fluxcal");
calC.setapply(type="D",                # Arrange to apply polarization
              t=0,                     #  D-term solutions
              table="ap366.dcal");
calC.setsolve(type="T",                # Arrange to solve for T to
              t=10,                    #  get an incremental solution to
              preavg=0,                #  G with a phase-only correction.
              phaseonly=T,
              table="ap366.tcal");
calC.state();                          # Review the setapply/setsolve settings
calC.solve();                          # Solve for T
                                       #  Write the output to a table
                                       #  called ap366.tcal1 on disk
calC.plotcal(plottype="PHASE",         # Examine solutions
             tablename="ap366.tcal",
             fields=10);
The calC.state function reports in the logger window:
  The following calibration components will be applied:
    D table=ap366.dcal t=0 select=[]
    G table=ap366.fluxcal t=0 select=[]
    P table=<pre-computed> t=5 select=[]
  The following calibration components will be solved for:
    T table=ap366.tcal t=10 preavg=0 phaseonly=T refant=4 append=F
The calC.solve function reports messages like:
  Initializing solvable atmospheric gain/transmission (T-matrix)
  For interval of 10 seconds, found 96 slots
  Applying G table from ap366.fluxcal
  Applying D table from ap366.dcal
  Solving for T
  T Jones Slot=1, 0957+561, spw=1: 22-May-1998/23:05:30 to 22-May-1998/23:05:35
  T Jones    Initial fit per unit weight = 0.0826564 Jy, sum of weights = 270
  T Jones    Final   fit per unit weight = 0.05584 Jy after 5 iterations
  T Jones Slot=2, 0957+561, spw=1: 22-May-1998/23:05:40 to 22-May-1998/23:05:45
  T Jones    Initial fit per unit weight = 0.0727398 Jy, sum of weights = 1300
  T Jones    Final   fit per unit weight = 0.0501334 Jy after 4 iterations
  ...
  Storing T matrix in table ap366.tcal
There is not a whole lot of difference between initial and final fits as expected because this is only an incremental solution.
Now apply the P, G, D, and T solutions and write a new CORRECTED_DATA
column for the target source in the MS. Note: Only the
calC.setapply for T needs to be set now because P, G, & D solutions
are already set up to apply:
calC.setapply(type="T",                # Arrange to apply T solutions
              t=0,                     #  note: P, G, & D solutions are
              table="ap366.tcal");     #  already set to apply
calC.correct();                        # Correct the data
Now, CLEAN the self-calibrated image of 0957+561 to see how this
process improved the image:
imgrC.setdata(mode='none',             # Select continuum data for the target
              fieldid=10);             #  source in field 10 (0957+561)
imgrC.setimage(nx=512,                 # Set image plane parameters
               ny=512,
               cellx='0.1arcsec',
               celly='0.1arcsec',
               stokes='IQUV',          # (full polarization)
               fieldid=10);
imgrC.weight(type='uniform');          # Set uniform weighting
imgrC.clean(algorithm='clark',         # Image, and deconvolve using
            niter=5000,                #  the Clark CLEAN
            gain=0.1,                  #  Write the cleaned image to the file
            model='0957+561.mod2',     #  0957+561.im2 on disk.
            image='0957+561.im2',
            residual='0957+561.resid2',
            mask='0957+561.mask2',
            interactive=T,             # Clean interactively, have the option
            npercycle=500);            #  to choose a new clean region every
                                       #  500 cleaning cycles.
dv.gui();                              # Use default viewer to view and analyze images.
Figure 1.22 (left) shows the ``dirty image'' that pops up on the interactive CLEAN viewer interface along with an outline of the 2 mask regions that have been specified for the image. After 500 iterations, the residual image will be displayed along with an outline showing your previously defined mask region. You will find that additional, low-level source structure becomes visible. Add additional mask regions around the low-level emission (Fig. 1.22 (right)) and continue cleaning. Use the ImageStatistics function in the mask viewer to compare the maximum residual reported in the logger window with the residual image RMS. For this example, the final logger report shows:
Clean used 500 iterations to get to a max residual of 0.000248331
While the RMS in the image is about 0.27 mJy beam-1. It is
usually not a good idea to clean below the RMS level in the residual
image, therefore, the CLEAN process was stopped at this point.
The final, self-calibrated image of the gravitational lens, 0957+561
shown in Fig. 1.23, shows additional source structure that
was only hinted at below the 3![]() level in the pre-self-cal
image. The image peak is now
level in the pre-self-cal
image. The image peak is now ![]() 29.7 mJy beam-1, and the RMS
is 0.29 mJy beam-1, a factor of 1.6 times better than before
self-calibration.
29.7 mJy beam-1, and the RMS
is 0.29 mJy beam-1, a factor of 1.6 times better than before
self-calibration.
If you have a data set in which there is a strong continuum source or strong line emission (e.g. a maser feature), and self-calibration improved the image significantly, then you can repeat the self-calibration as necessary. Note: Self-calibration can be applied to any solvable calibration component (G, and/or D in the present example).
In the spectral-line data set, there is an 80 mJy continuum source just south of the main line emission in NGC 5921. We can use this source to self-calibrate the line emission.
Create an image with line-free continuum channels only. First, create
an image from line-free channels 5-8:
First, create the imager tool if it is not already created. Then,
create an image of line-free continuum channels only and fill the
MODEL_DATA column for the specified channels in the MS for the target
source using the output model from the last execution of imager.clean on the continuum-only data:
imgrS:=imager(filename='ngc5921.ms');# Create imager tool if needed.
imgrS.setdata(mode='channel',        # Select channel data for 4
              nchan=4,               #  continuum-only channels in
              start=2,               #  field 3 (target field)
              step=1,
              spwid=1,
              fieldid=3);
imgrS.setimage(nx=256,               # Imaging parameters
               ny=256,
               cellx='15arcsec',
               celly='15arcsec',
               stokes='I',
               mode='channel',       # Choose channel mode
               nchan=1,              # Grid selected channels into one.
               start=2,
               step=4,
               fieldid=3);
imgrS.weight(type='briggs',          # Robust weighting
             rmode='norm',
             robust=0.5);
imgrS.clean(algorithm='clark',       # Image and deconvolve with Clark CLEAN
            niter=6000,              #  to a threshold of 2 mJy
            gain=0.1,                #  Write the cleaned image,
            threshold='0Jy',        #  ngc5921.c1.im and the model,
            model='ngc5921.c1.mod',  #  image ngc5921.c1.mod to disk
            image='ngc5921.c1.im',
            residual='ngc5921.c1.resid');
imgrS.setdata(mode='channel',        # Select channel data for 4
              nchan=4,               #  continuum-only channels in
              start=2,               #  field 3 (target field)
              step=1,
              spwid=1,
              fieldid=3);

imgrS.ft(model='ngc5921.c1.mod');    # Fill MODEL_DATA column in the MS
Now, to derive an incremental solution over the current G, do an
``atmospheric phase'' T calibration which will be derived from the
continuum channels which were used to create the model (phase only,
polarization-independent solutions): Note: the MODEL_DATA column is
read automatically when solving for T. Set the time interval for
the T solutions to be roughly the same as the solution intervals to
get scan-based solution intervals.
calS.setdata(mode='channel',         # Select channel data for 4
              nchan=4,               #  continuum-only channels in
              start=2,               #  field 3 (target field)
              step=1,
              msselect='FIELD_ID==3');
calS.reset();                        # Reset apply/solve state
calS.setapply(type="G",              # Arrange to apply flux-scaled
              t=0,                   #  G solutions
              table="ngc5921.fluxcal");
calS.setapply(type="B",              # Arrange to apply
              t=0,                   #  Bandpass solutions
              table="ngc5921.bcal");
calS.setsolve(type="T",              # Arrange to solve for T to
              t=100,                 #  get an incremental solution to
              preavg=0,              #  G with a phase-only correction.
              refant=14,
              phaseonly=T,           #  Write the output to a table
	      table="ngc5921.tcal"); #  called ngc5921.tcal on disk
calS.state();                        # Review the setapply/setsolve settings
calS.solve();                        # Solve for T
calS.plotcal(plottype="PHASE",       # Examine solutions
             tablename="ngc5921.tcal");
The calS.state function reports in the logger window:
  The following calibration components will be applied:
    B table=ngc5921.bcal t=0 select=[]
    G table=ngc5921.fluxcal t=0 select=[]
  The following calibration components will be solved for:
    T table=ngc5921.tcal t=100 preavg=0 phaseonly=T refant=14 append=F
The calS.solve function reports messages like:
  Initializing solvable atmospheric gain/transmission (T-matrix)
  For interval of 100 seconds, found 21 slots
  Applying B table from ngc5921.bcal
  Applying G table from ngc5921.fluxcal
  Solving for T
  T Jones Slot=1, N5921, spw=1: 13-Apr-1995/09:33:00 to 13-Apr-1995/09:33:00
  T Jones    Initial fit per unit weight = 0.273765 Jy, sum of weights = 1.06142e+06
  T Jones    Final   fit per unit weight = 0.26221 Jy after 9 iterations
  T Jones Slot=2, N5921, spw=1: 13-Apr-1995/09:34:00 to 13-Apr-1995/09:35:00
  T Jones    Initial fit per unit weight = 0.275376 Jy, sum of weights = 2.12285e+06
  T Jones    Final   fit per unit weight = 0.26615 Jy after 6 iterations
There is not a whole lot of difference between initial and final fits as expected because this is only an incremental solution. Now apply the G, B, and T solutions to ALL the data and write a new CORRECTED_DATA column for the target source in the MS:
calS.setdata(mode='channel',         # Select channel data for all
              nchan=63,              #  channels in field 3 (NGC 5921)
              start=1,
              step=1,
              msselect='FIELD_ID==3');
calS.reset();                        # Reset apply/solve state
calS.setapply(type="G",              # Arrange to apply flux-scaled
              t=0,                   #  G solutions
              table="ngc5921.fluxcal");
calS.setapply(type="B",              # Arrange to apply
              t=0,                   #  Bandpass solutions
              table="ngc5921.bcal");
calS.setapply(type="T",              # Arrange to apply T solutions
              t=0,
              table="ngc5921.tcal");
calS.correct();                      # Correct the data
CLEAN the self-calibrated image of NGC 5921 to see if the image is
improved:
imgrS.setdata(mode='channel',        # Select channel data for field 3
              nchan=60,
              start=3,
              step=1,
              fieldid=3)
imgrS.setimage(nx=256,               # Select imaging parameters
               ny=256,
               cellx='15arcsec',
               celly='15arcsec',
               stokes='I',
               mode='channel',
               nchan=60,
               start=3,
               step=1,
               fieldid=3);
imgrS.weight(type='briggs',          # Robust weighting
             rmode='norm',
             robust=0.5);
imgrS.clean(algorithm='hogbom',      # Image and deconvolve the inner quarter
            niter=6000,              #  of the image with Hogbom CLEAN
            gain=0.1,                #  to a threshold of 1 mJy.
            threshold='1.0mJy'       #  Write the cleaned image to the file
            model='ngc5921.mod2',    #  ngc5921.im2 on disk.
            image='ngc5921.im2',
            residual='ngc5921.resid2'
            interactive='F'
Use the viewer to examine the final source image ngc5921.im2.
The RMS is ![]() 1.1 mJy beam-1 (versus 1.3 mJy beam-1
before self-calibration). The peak of the continuum source is now
84.5 mJy beam-1. Self-calibration provided a marginal
improvement to the image.
1.1 mJy beam-1 (versus 1.3 mJy beam-1
before self-calibration). The peak of the continuum source is now
84.5 mJy beam-1. Self-calibration provided a marginal
improvement to the image.
If you have a data set in which there is a strong continuum source or strong line emission (e.g. a maser feature), and self-calibration improved the image significantly, then you can repeat the self-calibration as necessary. Note: Self-calibration can be applied to any solvable calibration component (G, T, and/or B in the present example).
See the Display and Image analysis chapters of Getting Results for a detailed discussion on display and image analysis tools and the options available. A brief orientation on the use of the viewer a key element in image analysis, is given below. The viewer is described in detail in the chapter on Display of Data while the 'Adjust' options to taylor the image display parameters are described at Adjust.
The Viewer
To start the viewer type:
include 'viewer.g'
dv.gui();
The viewer Data Manager and Display Panel GUIs will appear. Using the Data Manager, left-click on an image you would like to see in the Display Panel and choose the display type (e.g. Raster Image, Contour Map). The image will be loaded into the Display Panel. You can load as many images and display types as you want.
To zoom in on a region, left-click on the zoom button (magnifying glass icon) in the upper left of the Viewer display, use the left mouse button to make a region, double-left-click in the region to zoom. To un-zoom, hit the Unzoom button at the bottom of the Display.
Image, axis, and label display options are controlled via the 'Adjustment' panel. Left-click on the Adjust... button to bring up this panel. There are a wide range of options to choose from: e.g. plot the beam, change the color map or stretch of an image, change contour lines, change the line width or color, add or delete labels. Once you have the image the way you like it, you can save the state of the image by left-clicking on the 'Save' button in the 'Adjustment' panel. The display parameters can then be restored later by left-clicking on the 'Restore' button.
To obtain statistics on all or part of an image, left-click on the Tools: ImageAnalysis button at the top of the Viewer Display. An Image Analysis GUI will be created. Left-click on Statistics to show the statistics panel. The Full button will produce statistics on the full image (all planes). The Plane button will produce statistics on only the region being displayed on the Viewer panel. Thus, to estimate the RMS in an image, zoom in on a region that has no emission and left-click on the Statistics panel 'Plane' button.
Use the 'DisplayData: Register' Panel to choose which images you want to register and display together. Use the 'DisplayData: Remove' Panel to delete images from the stack.
To print the image, left-click on the Print button at the bottom of the Viewer Panel. You will get a Canvas Print Manager GUI to specify the output postscript file name or send the image to a local printer. Postscript files will be written to the directory you started AIPS++ in.
Below are image analysis examples that are useful for analyzing the example data sets.
GUI Interface:
We want to form a linear polarization intensity image, e.g.
P = ![]() and a vector image of the electric vectors of the
polarization, e.g. (Q + iU) as described in the Image
analysis chapters of Getting Results.
First, start an image polarization tool which provides access to
a slew of tools that are useful for analyzing polarization images:
and a vector image of the electric vectors of the
polarization, e.g. (Q + iU) as described in the Image
analysis chapters of Getting Results.
First, start an image polarization tool which provides access to
a slew of tools that are useful for analyzing polarization images:
impolC:=imagepol(infile="0957+561.im2");   # Start the image polarization tool
                                           #  for the image 0957+561.im2
Create a linear polarization intensity tool (leave all inputs to
their default values):
linpolintC:=impolC.linpolint();            # Form linear polarization intensity
                                           #  image tool, linpolint
linpolintC.subim(outfile='0957+561.pint'); # Form the subim tool and write
                                           #  the image 0957+561.pint
                                           #  to a file on disk
subim.done();                              # Close the tool (no longer needed)
linpolintC.done();                         # Close the tool (no longer needed)
impolC.complexlinpol(outfile="0957+561.cmplx");
                                           # Create a vector image of the
                                           # electric vectors of the polarization
impolC.done();                             # Close the tool (no longer needed)
You should now have two image files called 0957+561.pint & 0957+561.cmplx on disk as well as the original 0957+561.im2 polarization image. Follow the instructions above to load the images into the viewer:
Bring up the Image Analysis GUI and determine the RMS of the
polarization intensity image using the 'Statistics' panel (for the
0957+561.pint image, the RMS should be ![]() 11 mJy beam-1). We
will use this value to set a mask expression in the 0957+561.cmplx
vector image to get rid of polarization vectors that are below the RMS
level.
11 mJy beam-1). We
will use this value to set a mask expression in the 0957+561.cmplx
vector image to get rid of polarization vectors that are below the RMS
level.
Left-click on the 'Adjust' button to bring up 3 Adjustment panels, one for each image. Then:
Now, calibrate the electric-vector positions angle (EVPA):
EVPA
= 0.5tan-1(U/Q) = 0.5*(R-L phase difference).
First, it is necessary to specify the true ratio U/Q found for the
polarization calibrator, 3C 286. During the polarization calibration,
we found for 3C 286 (
I = 7.462 Q = + 0.4982 U = - 0.6988 V = 0),
thus, the measured R-L phase difference is:
tan-1(- 0.6988/0.4982) = - 54.5o. Since U is negative and
Q is positive, this is in the 4th quadrant.
From the VLA calibration web page
(http://www.aoc.nrao.edu/![]() gtaylor/calman/polcal.html) we find the
true R-L phase difference for 3C 286 is
66o. Thus, our phases
should be rotated by
66 + 54.5 = 120.5o or
EVPA = 0.5*120.5o. In the 'Adjust' panel for the 0957+561.cmplx image,
enter Extra rotation = 120.5/2. To plot the magnetic field
vectors, enter Extra rotation =
120.5/2 + 90. The final
images are shown in Fig. 1.24.
gtaylor/calman/polcal.html) we find the
true R-L phase difference for 3C 286 is
66o. Thus, our phases
should be rotated by
66 + 54.5 = 120.5o or
EVPA = 0.5*120.5o. In the 'Adjust' panel for the 0957+561.cmplx image,
enter Extra rotation = 120.5/2. To plot the magnetic field
vectors, enter Extra rotation =
120.5/2 + 90. The final
images are shown in Fig. 1.24.
Now, use the image tool to subtract the continuum emission in the image plane using the line-free channels (5-8) and (55-58).
First, the image coordinate system is stored so that regions can be made in world coordinates. Then make two regions with the line-free emission and union them together. Note, a union of regions is a compound region that has to be made from two *world* regions, not pixel regions, so it must be constructed from regions made with the wrange function from the default regionmanager (drm). Once the line-free channels are unioned together, an integrated continuum image is made and subtracted from the line-cube.
imS:=image('ngc5921.im2');        # Start Image tool

cs:=imS.coordsys();               # Store image coordinate system
                                  #  in the variable 'cs'

range1:=dq.quantity([5,8],'pix');
                                  # Create variable 'range1'

cont1:=drm.wrange(pixelaxis=4,    # Make first region for lower
                  range=range1,   #  continuum channels,
                  csys=cs);       #  Pixelaxis 4 = frequency axis

range2:=dq.quantity([55,58],'pix');
                                  # Create variable 'range2'

cont2:=drm.wrange(pixelaxis=4,    # Make second region for upper
                  range=range2,   #  continuum channels,
                  csys=cs);

cont3:=drm.union(cont1,cont2);    # Union the two chunks of data together

imS.moments(outfile='ngc5921.cont',
            moments=-1,           # Create an integrated
            axis=4,               #  continuum image, ngc5921.cont,
            region=cont3);        #  and write the file to disk.

nocont:=imagecalc(outfile='ngc5921.nocont',
                  pixels='ngc5921.im2 - ngc5921.cont');
                                  # Subtract the continuum from the
                                  #  line cube and write the line-only
                                  #  cube, ngc5921.nocont, to disk.

imS.done();                       # close the tool, no longer needed
cs.done();                        # close the tool, no longer needed
nocont.done();                    # close the tool, no longer needed
View the final image in the Viewer. The continuum sources should now be gone and you can see the rotation curve of the HI in the galaxy as you move through the line cube Fig. 1.25.
Now, take a spectrum through the cube. There are two ways to pick positions for taking spectra: 1) view the continuum image and take spectra at the locations of the continuum sources to make sure that continuum subtraction has gone OK; 2) view the 0th moment image (generated by the imageprofilefitter tool automatically) and use this to select spectra in regions with line emission. The latter is the default behavior. However spectral line cubes can have noisy beginning and end channels, so it is often better to view your own 0th moment image when selecting positions for spectra. Both of these ways are shown below:
Use the continuum image to check that the continuum subtraction has gone well.
include 'imageprofilefitter.g';   # Create image profile fitter tool

pf:=imageprofilefitter(infile='ngc5921.nocont',
                       infile2='ngc5921.cont');
                                  # Get a spectrum from ngc5921.nocont
                                  #  But use the image of ngc5921.cont
                                  #  To see where to place the cursor
You will get a Viewer window labeled 'Image Profile Fitter' which shows the line+continuum image. To get a spectrum:
The spectrum taken at the position of the brightest continuum source, shows that the continuum subtraction appears to have done a good job - the spectrum is flat and amplitude is zero (Fig. 1.26).
Create a line-only 0th moment image and use this to select regions of line emission to take spectra: Moment analysis for line-emission cubes. Viewing the image we find that there is line emission in channels 7-49.
imS:=image('ngc5921.nocont');                # Start Image tool

cs:=imS.coordsys();                       # Store image coordinate system

line_range:=dq.quantity([7,49],'pix');    # There is line emission in
                                          #  channels 7-49

line_region:=drm.wrange(pixelaxis=4,      # Define the line region in
                        range=line_range, #  world coordinates
                        csys=cs);

imS.moments(moments=[0, 1, 2] ,
          smoothaxes=[1,2,4] ,            # Pixels to be included in
                                          # moment analysis will be
                                          # decided by examing the
                                          # flux in a smoothed version
                                          # of the data.
                                          # We will smooth in ra, dec
                                          # and velocity (axis=1,2,4)

          region = line_region,           # Only use channels with
                                          # line emission

          mask='$imS>0',                  # Only include pixels with
                                          # positive flux in original map

          excludepix=[0.003],             # Only sum flux from pixels
                                          # in smoothed map with flux
                                          # greater than abs(0.003 Jy)

          smoothtypes="gauss gauss hann" ,# Gaussian smoothing in ra
                                          # and dec; Hanning smoothing
          smoothwidths=[5,5,3] ,          # Width of smoothing kernals

          doppler="OPTICAL" ,             # optical velocity definition

          outfile='ngc5921.nocont2');
The moments command will create 3 images:
          ngc5921.nocont2.integrated                # Moment 0 image
          ngc5921.nocont2.weighted_coord            # Moment 1 image
          ngc5921.nocont2.weighted_dispersion_coord # Moment 2 image
Now take a spectra using the clipped, integrated image to isolate
the area of line-emission:
include 'imageprofilefitter.g';
pf2:=imageprofilefitter(infile='ngc5921.nocont',
                        infile2='ngc5921.nocont2.integrated');
The spectrum shown in Fig. 1.27, illustrating a classic
double-peaked line profile showing the galactic rotation, was made
with the 'Polygon-Region' option in the Viewer window to circle the
emission in NGC 5921, then double left-clicking on the region to
create the spectrum.
After completing work with AIPS++ tools, it is desirable to close them out by issuing the done function for each, as follows:
calC.done();                       # Finish imager tool
imgrC.done();                      # Finish calibrater tool
imC.done();                        # Finish image tool
calS.done();                       # Finish imager tool
imgrS.done();                      # Finish calibrater tool
imS.done();                        # Finish image tool
Hamaker, J.P., Bregman, J.D., and Sault, R.J., 1996a, A&AS, 117, 137.
Sault, R.J., Hamaker, J.P., and Bregman, J.D., 1996b, A&AS, 117, 149.
This appendix provides a list of common AIPS tasks, and their equivalent AIPS++ tool or tool function names. The two packages differ in both their architecture and calibration and imaging models, and there is often not a direct correspondence. However, this index does provide a scientific user of AIPS++ who is familiar with AIPS, with a simple translation table to map their existing data reduction knowledge to the new package.
The index includes common AIPS tasks and verbs; adverbs are not included. Capabilities which exceed those available in AIPS are not listed here.
| AIPS Task/Verb | Description | AIPS++ tool/function |
|---|---|---|
| APCLN | CLEAN deconvolution | imager.clean |
| BLCAL | Baseline-based (A, |
calibrater.solve |
| BLING | Baseline-based fringe-fitter | not yet available |
| BPASS | Bandpass calibration | calibrater.solve |
| CCEDT | Edit CC tables | componentmodels |
| COMB | Image combination | image.calc, imagepol |
| CPASS | Polynomial bandpass calibration | calibrater.solve |
| CALIB | (A, |
calibrater.solve |
| DBCON | uv-data concatenation | not yet available |
| DTSIM | Simulator | simulator |
| DTSUM | uv-data summary | ms.summary |
| FILLM | VLA filler | vlafiller |
| FITLD | VLBA filler | not yet available |
| FITTP | UVFITS writer | ms.tofits |
| FRING | VLBI fringe-fitter | not yet available |
| GETJY | Set flux density scale | calibater.fluxscale |
| IBLED | Interactive VLBI editor | not yet available |
| IMAGR | Synthesis imaging | imager |
| AIPS Task/Verb | Description | AIPS++ tool/function |
|---|---|---|
| IMFIT | Image-plane component fitter | imagefitter |
| IMLOD | FITS image filler | image.imagefromfits |
| IMH | File header summary | table.summary |
| IMSTAT | Image statistics | image.statistics |
| ISPEC | Plot image slice | not yet available |
| JMFIT | Image-plane component fitter | imagefitter |
| LISTR | List uv and calibration data | tablebrowser |
| MCAT | List image catalog | catalog |
| MK3IN | MK3 VLBI filler | not yet available |
| MOVE | Move uv-data files | tablecopy |
| MSORT | Sort uv-data | tablecommand |
| MX | Synthesis imaging | imager |
| PBCOR | Primary beam correction | imager.setvp, vpmanager |
| PCAL | Polarization calibration | calibrater.solve |
| PRTAB | List table data | tablebrowser |
| PRTAN | List AN table data | tablebrowser |
| PRTUV | List uv-data | tablebrowser |
| RENAME | Rename file name | tablerename |
| SETJY | Set source properties | imager.setjy |
| SNPLT | Plot calibration solutions | calibrater.plotcal |
| SUBIM | Extract sub-image | image.subimage |
| SPFLG | Interactive line data editing | not yet available |
| SPLIT | Apply calibration | calibrater.correct, map.applycal |
| Split out calibrated data | not yet available | |
| TAPLT | General table plotting | pgplotter, table |
| TBIN | Read table from ASCII format | tablefromascii |
| TBOUT | Write table to ASCII format | table.toascii |
| TRANS | Transpose an image | not required in AIPS++ |
| TVBOX | Set regions in an image | regionmanager |
| TVFID | Adjust TV display | viewer |
| TVFLG | Interactive TB data editing | msplot |
| TVLOD | Load image to TV display | viewer |
| UCAT | List uv-data catalog | catalog |
| UVCON | Simulator | simulator |
| UVFIT | uv-plane component fitter | not yet available |
| UVFLG | Command-based flagging | flagger |
| UVLOD | UV-FITS filler | ms.fitstoms |
| UVMOD | Simulator | simulator |
| UVPRT | List uv-data | tablebrowser |
| UVSRT | Sort uv-data | tablecommand |
| UVSUB | Source model computation | imager.ft |
| VBGLU | Concatenate VLBI data | not yet available |
| VBPLT | Baseline-based uv-data plotting | msplot |
| VMEM | MEM deconvolution | imager.mem |
| VPLOT | Baseline-based uv-data plotting | msplot |
| ZAP | Delete a file | tabledelete |
This appendix provides a list of common Miriad tasks, and their equivalent AIPS++ tool or tool function names. The two packages differ in both their architecture and calibration and imaging models, and there is often not a direct correspondence. However, this index does provide a scientific user of AIPS++ who is familiar with MIRIAD, with a simple translation table to map their existing data reduction knowledge to the new package.
| MIRIAD Task | Description | AIPS++ tool/function |
|---|---|---|
| atlod | load ATCA data | atcafiller |
| blflag | Interactive baseline based editor/flagger | msplot raster displays |
| cgcurs | Interactive image analysis | Viewer |
| cgdisp | Image display, overlays | Viewer |
| clean | Clean an image | imager |
| fits | FITS image filler | image.imagefromfits |
| gpboot | Set flux density scale | calibrater.fluxscale |
| gpcal | Polarization leakage and gain calibration | calibrator with 'G' and 'D' |
| gpcopy | copy calibration tables | generally not needed |
| gpplt | Plot calibration solutions | calibrater.plotcal |
| imcomb | Image combination | imager |
| imfit | Image-plane component fitter | imagefitter |
| impol | Create polarization images | imagepol |
| imstat | Image statistics | image.statistics |
| imsub | Extract sub-image | image.subimage |
| invert | Synthesis imaging | imager |
| linmos | linear mosaic combination of images | imager |
| maths | Calculations involving images | images.imagecalc, images.calc |
| mfcal | Bandpass and gain calibration | calibrator with 'G' and 'B' |
| prthd | Print header of image or uvdata | image.summary, ms.summary |
| restor | Restore a clean component model | imager |
| selfcal | selfcalibration of visibility data | imager, calibrater |
| tvclip | automated flagging based on clip levels | autoflag |
| tvdisp | Load image to TV display | viewer |
| tvflag | Interactive TB data editing | msplot |
| uvaver | Average/select data, apply calibration | average not available |
| uvfit | uv-plane component fitter | not yet available |
| uvflag | Command-based flagging | flagger |
| uvgen | Simulator | simulator |
| uvlist | List uv-data | tablebrowser |
| uvmodel | Source model computation | imager.ft |
| uvplt | uv-data plotting | ms |
| uvsplit | split uv file in sources and spectral windows | not yet available |
#
# Work in the current directory:
#
user.aipsdir:   .
#
# Put scratch files here: can be a list of directories
#
user.directories.work:  /export/home/your_computer/aips++/scratch
#
# Put the aips++ cache files in one place: it shouldn't be
# over an NFS mount or it will slow aips++ down to a crawl!
#
user.cache:     /export/home/your_computer/aips++/cache
#
# Set these so that bug(), ask(), etc. know who you are
#
userinfo.name:  Your_name
userinfo.email: Your_email@institution.edu
userinfo.org:   Your Organization
#
# Switch on the display of memory used by each server
#
user.display.memory:    True
#
# Uncomment this to send log messages to the deep blue yonder
#
#logger.file:           none
#
# plot axis labels as the default in the viewer
# and set initial character size (normal default size = 1.2):
#
display.axislabels: on
display.axislabels.charsize: 1.2
#
#
system.aipscenter:       NorthAmerica
logger.file:             aips++.log
logger.height:           15
catalog.gui.auto:        T
catalog.confirm:         T
catalog.view.PostScript: ghostview
toolmanager.gui.auto:    T
toolmanager.refresh:     10s
Summary created with the command msetC.summary(verbose=T):
           MeasurementSet Name:  ap366.ms      MS Version 2

   Observer: AP366     Project:
Observation: VLA
Data records: 93239       Total integration time = 21935 seconds
   Observed from   22-May-1998/22:40:05   to   23-May-1998/04:45:40

   ObservationID = 1         ArrayID = 1
  Date        Timerange                Scan  Field          DataDescIds
  22-May-1998/22:40:05.0 - 22:41:10.0     1  0917+624       [1]
              23:05:30.0 - 23:14:00.0     2  0957+561       [1]
              23:26:55.0 - 23:28:00.0     3  0917+624       [1]
              23:46:25.0 - 23:47:30.0     4  0917+624       [1]
  23-May-1998/00:10:50.0 - 00:18:20.0     5  0957+561       [1]
              00:30:15.0 - 00:31:20.0     6  0917+624       [1]
              00:53:15.0 - 00:54:50.0     7  1328+307       [1]
              04:44:05.0 - 04:45:40.0     8  1328+307       [1]
Fields: 3
  ID   Name          Right Ascension  Declination   Epoch
  9    0917+624      09:21:36.23      +62.15.52.18  J2000   ** Gain calibrator
  10   0957+561      10:01:20.70      +55.53.52.65  J2000   ** Source
  11   1328+307      13:31:08.28      +30.30.32.94  J2000   ** Flux calibrator, 3C 286
                                                            ** (B1950 name, J2000 coords.)
Data descriptions: 1 (1 spectral windows and 1 polarization setups)
  ID    Ref.Freq    #Chans  Resolution  TotalBW     Correlations
  1     4885.1 MHz  1       50000  kHz  50000  kHz  RR  RL  LR  LL
Feeds: 28: printing first row only
  Antenna   Spectral Window     # Receptors    Polarizations
  1         -1                  2              [         R, L]
Antennas: 27:
  ID   Name  Station   Diam.    Long.         Lat.
  1    1     VLA:W16   25.0 m   -107.37.57.4  +33.53.33.0
  2    2     VLA:N16   25.0 m   -107.37.10.9  +33.54.48.0
  3    3     VLA:N48   25.0 m   -107.37.38.1  +33.59.06.2
  4    4     VLA:W8    25.0 m   -107.37.21.6  +33.53.53.0
  5    5     VLA:N56   25.0 m   -107.37.47.9  +34.00.38.4
  6    6     VLA:E16   25.0 m   -107.36.09.8  +33.53.40.0
  7    7     VLA:E24   25.0 m   -107.35.13.4  +33.53.18.1
  8    8     VLA:N8    25.0 m   -107.37.07.5  +33.54.15.8
  9    9     VLA:E8    25.0 m   -107.36.48.9  +33.53.55.1
  10   10    VLA:W40   25.0 m   -107.41.13.5  +33.51.43.1
  11   11    VLA:N24   25.0 m   -107.37.16.1  +33.55.37.7
  13   13    VLA:W56   25.0 m   -107.44.26.7  +33.49.54.6
  14   14    VLA:E64   25.0 m   -107.27.00.1  +33.50.06.7
  15   15    VLA:N64   25.0 m   -107.37.58.7  +34.02.20.5
  16   16    VLA:W32   25.0 m   -107.39.54.8  +33.52.27.2
  17   17    VLA:W64   25.0 m   -107.46.20.1  +33.48.50.9
  18   18    VLA:E48   25.0 m   -107.30.56.1  +33.51.38.4
  19   19    VLA:N40   25.0 m   -107.37.29.5  +33.57.44.4
  20   20    VLA:E40   25.0 m   -107.32.35.4  +33.52.16.9
  21   21    VLA:E56   25.0 m   -107.29.04.1  +33.50.54.9
  22   22    VLA:E72   25.0 m   -107.24.42.3  +33.49.18.0
  23   23    VLA:W24   25.0 m   -107.38.49.0  +33.53.04.0
  24   24    VLA:N32   25.0 m   -107.37.22.0  +33.56.33.6
  25   25    VLA:W72   25.0 m   -107.48.24.0  +33.47.41.2
  26   26    VLA:W48   25.0 m   -107.42.44.3  +33.50.52.1
  27   27    VLA:N72   25.0 m   -107.38.10.5  +34.04.12.2
  28   28    VLA:E32   25.0 m   -107.34.01.5  +33.52.50.3


Tables:
   MAIN                   93239 rows
   ANTENNA                   28 rows
   DATA_DESCRIPTION           1 row
   DOPPLER             <absent>
   FEED                      28 rows
   FIELD                     11 rows
   FLAG_CMD             <empty>
   FREQ_OFFSET         <absent>
   HISTORY                  108 rows
   OBSERVATION                1 row
   POINTING                 168 rows
   POLARIZATION               1 row
   PROCESSOR            <empty>
   SOURCE              <absent> (see FIELD)
   SPECTRAL_WINDOW            1 row
   STATE                <empty>
   SYSCAL              <absent>
   WEATHER             <absent>
Summary created with the command msetS.summary(verbose=T):
           MeasurementSet Name:  ngc5921.ms      MS Version 2

   Observer: TEST     Project:
Observation: VLA
Data records: 22653       Total integration time = 5280 seconds
   Observed from   13-Apr-1995/09:19:00   to   13-Apr-1995/10:47:00

   ObservationID = 1         ArrayID = 1
  Date        Timerange                Scan  Field          DataDescIds
  13-Apr-1995/09:19:00.0 - 09:24:30.0     1  1331+30500002  [1]
              09:27:30.0 - 09:29:30.0     2  1445+09900002  [1]
              09:33:00.0 - 09:48:00.0     3  N5921          [1]
              09:50:30.0 - 09:51:00.0     4  1445+09900002  [1]
              10:22:00.0 - 10:23:00.0     5  1445+09900002  [1]
              10:26:00.0 - 10:43:00.0     6  N5921          [1]
              10:45:30.0 - 10:47:00.0     7  1445+09900002  [1]
Fields: 3
  ID   Name          Right Ascension  Declination   Epoch
  1    1331+30500002 13:31:08.29      +30.30.32.96  J2000   ** Flux/bandpass cal, 3C 286
                                                               (J2000 name & coords.)
  2    1445+09900002 14:45:16.47      +09.58.36.07  J2000   ** Gain calibrator
  3    N5921         15:22:00.00      +05.04.00.00  J2000   ** Source
Data descriptions: 1 (1 spectral windows and 1 polarization setups)
  ID    Ref.Freq    #Chans  Resolution  TotalBW     Correlations
  1     1413.45MHz  63      24.4141kHz  1550.2 kHz  RR  LL
Feeds: 28: printing first row only
  Antenna   Spectral Window     # Receptors    Polarizations
  1         -1                  2              [         R, L]
Antennas: 27:
  ID   Name  Station   Diam.    Long.         Lat.
  1    1     VLA:N7    25.0 m   -107.37.07.2  +33.54.12.9
  2    2     VLA:W1    25.0 m   -107.37.05.9  +33.54.00.5
  3    3     VLA:W2    25.0 m   -107.37.07.4  +33.54.00.9
  4    4     VLA:E1    25.0 m   -107.37.05.7  +33.53.59.2
  5    5     VLA:E3    25.0 m   -107.37.02.8  +33.54.00.5
  6    6     VLA:E9    25.0 m   -107.36.45.1  +33.53.53.6
  7    7     VLA:E6    25.0 m   -107.36.55.6  +33.53.57.7
  8    8     VLA:W8    25.0 m   -107.37.21.6  +33.53.53.0
  9    9     VLA:N5    25.0 m   -107.37.06.7  +33.54.08.0
  10   10    VLA:W3    25.0 m   -107.37.08.9  +33.54.00.1
  11   11    VLA:N4    25.0 m   -107.37.06.5  +33.54.06.1
  12   12    VLA:W5    25.0 m   -107.37.13.0  +33.53.57.8
  13   13    VLA:N3    25.0 m   -107.37.06.3  +33.54.04.8
  14   14    VLA:N1    25.0 m   -107.37.06.0  +33.54.01.8
  15   15    VLA:N2    25.0 m   -107.37.06.2  +33.54.03.5
  16   16    VLA:E7    25.0 m   -107.36.52.4  +33.53.56.5
  17   17    VLA:E8    25.0 m   -107.36.48.9  +33.53.55.1
  18   18    VLA:W4    25.0 m   -107.37.10.8  +33.53.59.1
  19   19    VLA:E5    25.0 m   -107.36.58.4  +33.53.58.8
  20   20    VLA:W9    25.0 m   -107.37.25.1  +33.53.51.0
  21   21    VLA:W6    25.0 m   -107.37.15.6  +33.53.56.4
  22   22    VLA:E4    25.0 m   -107.37.00.8  +33.53.59.7
  24   24    VLA:E2    25.0 m   -107.37.04.4  +33.54.01.1
  25   25    VLA:N6    25.0 m   -107.37.06.9  +33.54.10.3
  26   26    VLA:N9    25.0 m   -107.37.07.8  +33.54.19.0
  27   27    VLA:N8    25.0 m   -107.37.07.5  +33.54.15.8
  28   28    VLA:W7    25.0 m   -107.37.18.4  +33.53.54.8


Tables:
   MAIN                   22653 rows
   ANTENNA                   28 rows
   DATA_DESCRIPTION           1 row
   DOPPLER             <absent>
   FEED                      28 rows
   FIELD                      3 rows
   FLAG_CMD             <empty>
   FREQ_OFFSET         <absent>
   HISTORY                  270 rows
   OBSERVATION                1 row
   POINTING                 168 rows
   POLARIZATION               1 row
   PROCESSOR            <empty>
   SOURCE              <absent> (see FIELD)
   SPECTRAL_WINDOW            1 row
   STATE                <empty>
   SYSCAL              <absent>
   WEATHER             <absent>
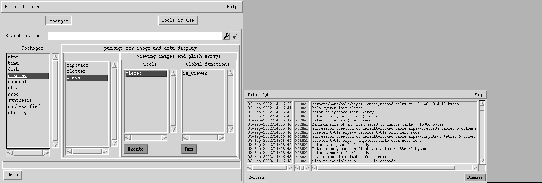
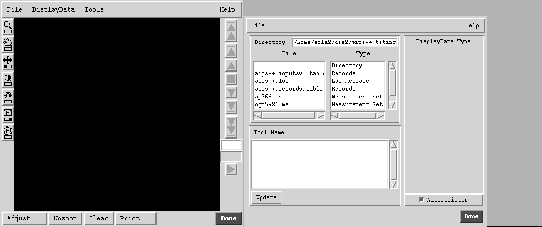
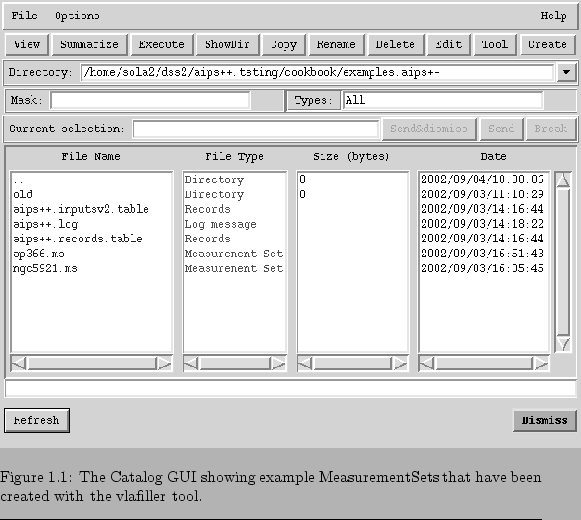
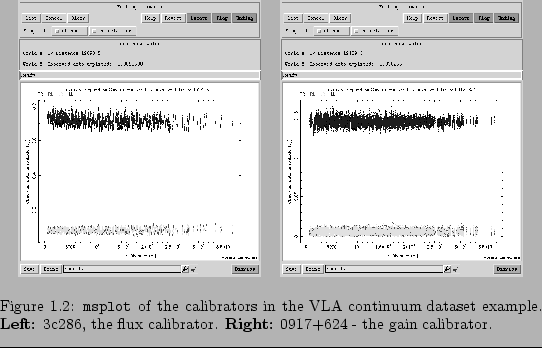
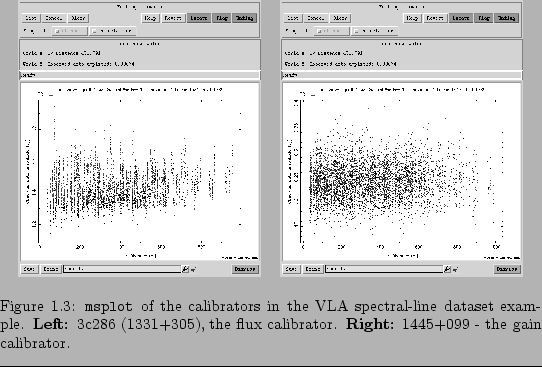
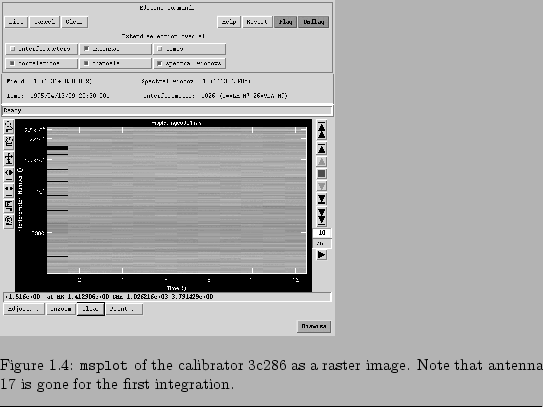
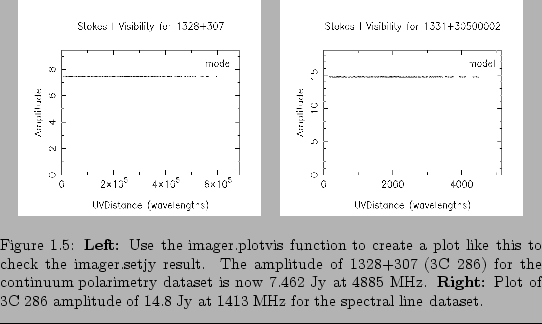
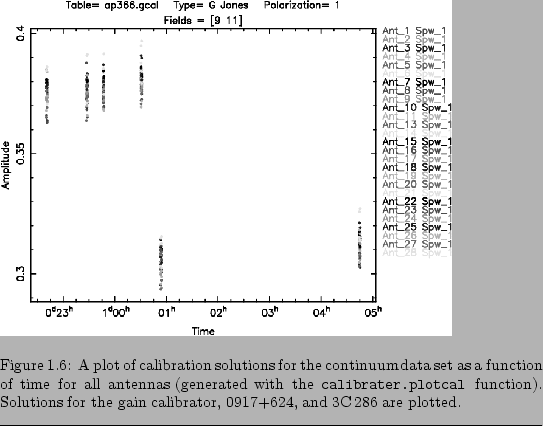
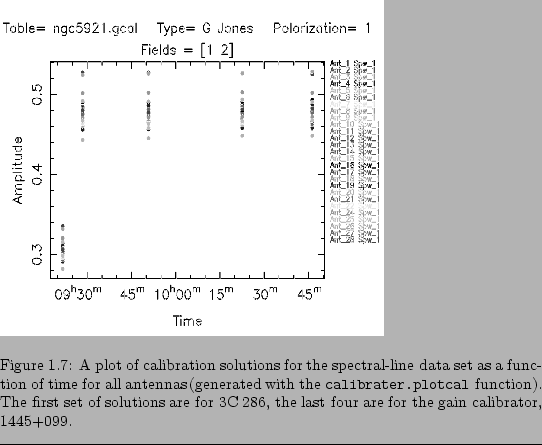
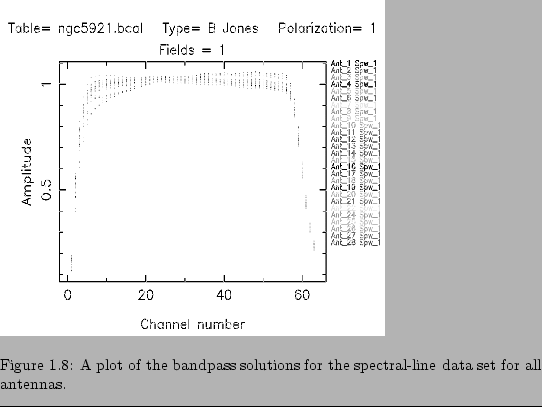
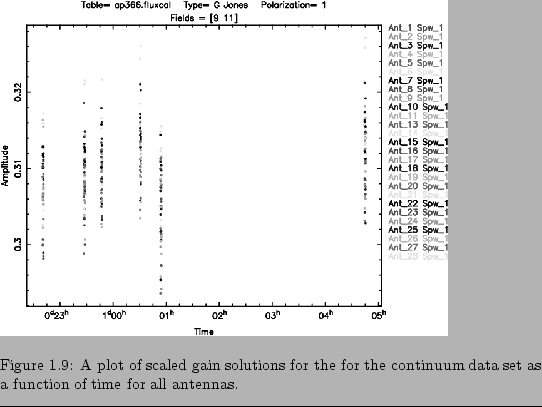
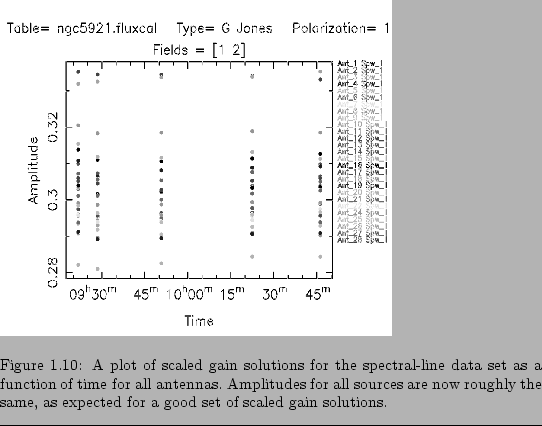

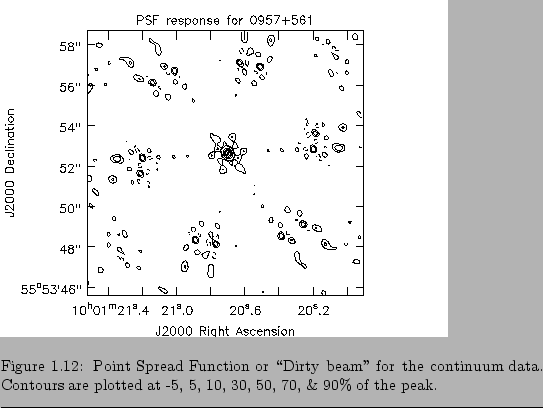
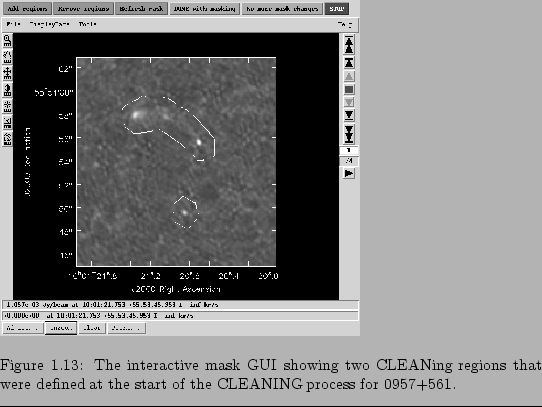
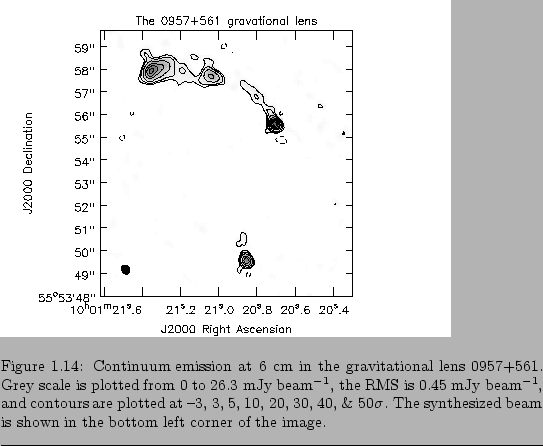

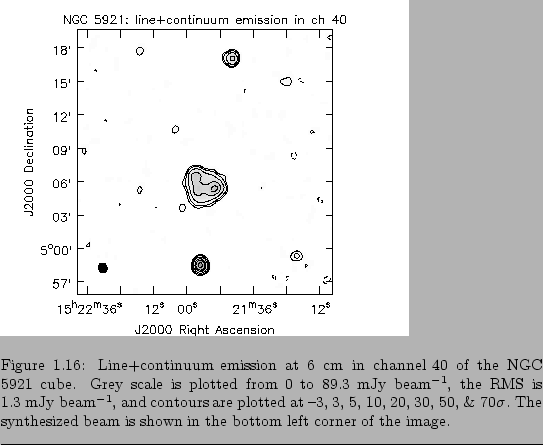
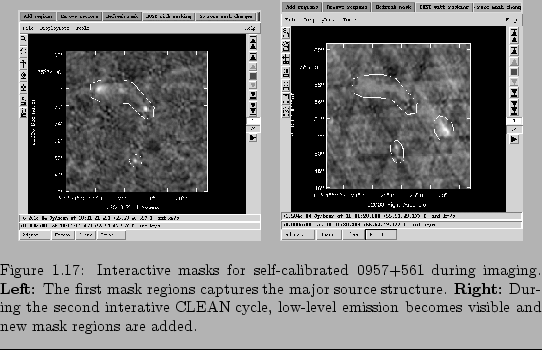
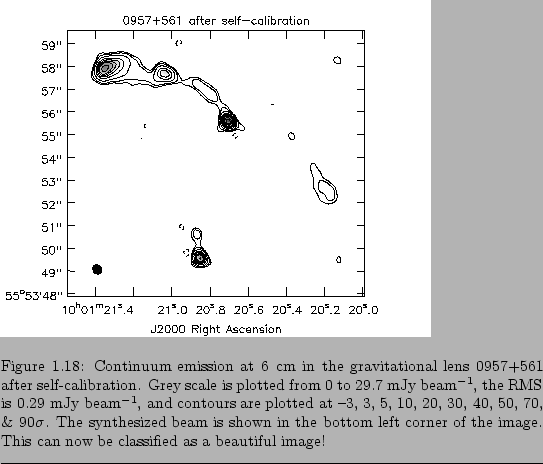
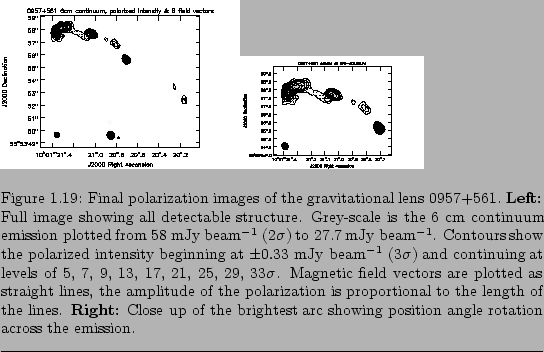
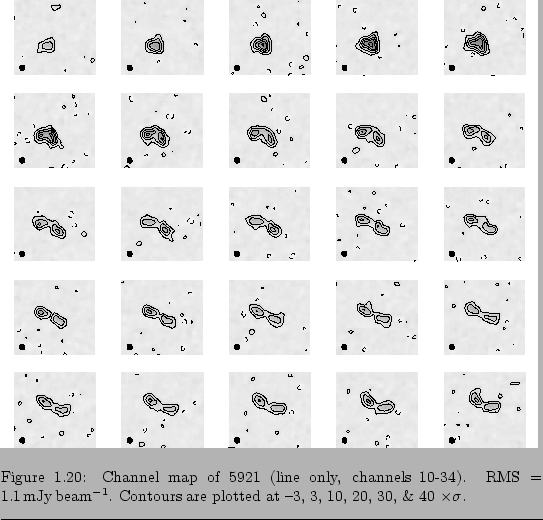
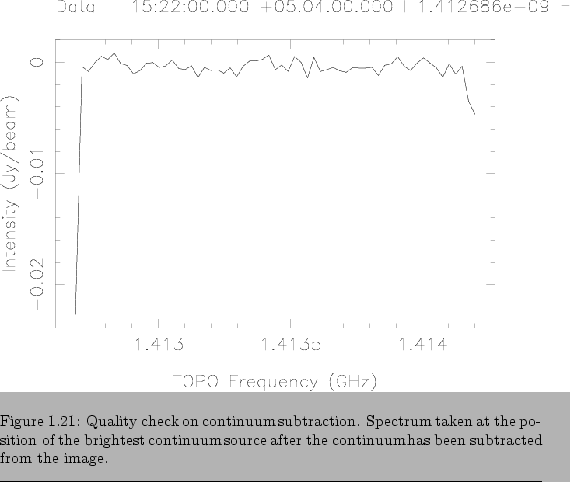
![\begin{figure}
% latex2html id marker 1360\epsfig{file=cookbook.dir/vla.ngc592...
...\caption[Spectrum of NGC 5921.]
{Spectrum of NGC 5921. }\hrulefill
\end{figure}](img40.gif)