
| Version 1.9 Build 1556
|
|


Next: The File Catalog GUI
Up: Getting Started in AIPS++
Previous: Running AIPS++
Subsections
The Tool Manager is key to the interactive GUI-based use of
AIPS++. To use AIPS++, it helps to have
mastered the use of the Tool Manager. For this reason, we
suggest that you work through this section especially
carefully, performing the suggested examples as you go
along.
Views of various aspects of AIPS++ can selected using the tab
buttons just underneath the top menu.
The three principal views are:
- Manager
- For traversing the hierachy of tools, and for creating
new instances of tools. This view (and the associated tab) is always
available.
- Tools in Use
- For interacting with existing tools. This view
(and the associated tab) is always available.
- Tools, Constructors, or Global Functions
- Each tool, constructor,
or global function has a view dedicated to it. These are added and
removed from the set of tabs as appropriate.
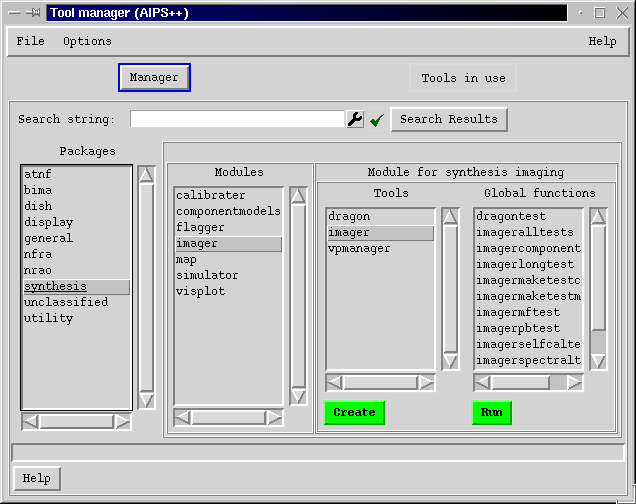
Figure 2: The Tool Manager GUI as it appears when AIPS++
is started. This is the Manager view.
As described above, the various tools and functions in
AIPS++ are arranged in a modular, hierarchical fashion. The overall
structure of AIPS++ from a user point of view can be seen using this
view of the Tool Manager GUI.

Figure 3: The Tool Manager GUI with the Tools in Use view displayed
Under the Tools in Use view, if you press the button right
button to ``Show all tools'', you will see a list of tools with
names like dc (default catalog),
dv (default viewer), dl (default logger),
dm (default measures). dm is an innovative
tool which performs varieties of operations related to
co-ordinates, time, quantities, and conversions. Any of these
tools can be activated by clicking the required tool
name and then clicking the Show button in the same window.
To see how this works, notice the tool dl (Logger) which was
already activated by default. Click the Dismiss button on the
Logger window. The Logger window is removed. Now select dl from
list of Tools in Use and click Show. The Logger window
reappears. This is the standard way in which the GUIs (Graphic User
Interfaces) of tools that are not in use can be removed (it helps to
reduce the clutter on your screen) and brought back when needed.
Note that at the bottom of this view there is a line of buttons.
These control which tools are shown, how they are listed, and how
often the list is updated.
Now switch back to the Manager view. The top layer of AIPS++,
packages, is listed in the
left most column. These are known as packages. Currently there are
nine packages in AIPS++ (general, utility, display, synthesis, dish,
BIMA, NRAO, NFRA, ATNF). In addition, you will see an entry
unclassified when a classification is not
possible.
Each package contains one or more modules. The list of modules
in each package can be seen by clicking on the name of the package in
column 1 of the Tool Manager GUI. The list of modules appears in Column 2.
For instance, click on the package synthesis. The following list of
modules appears in the second column:
- calibrater
- : module for calibrating UV data
- componentmodels
- : module for
making source components for use in deconvolution or self-calibration
- imager
- : module for most imaging needs
- simulator
- : module for simulating UV and other data
- msplot
- : module for plotting Visibility data in various ways
Each module can contain tools and global functions:
- tools
- are collections of related functions that operate on
some common data source. To use the functions of a tool, the
tool needs to be connected to the data source. This
connection is usually called ``creation'' or ``construction'', and is
performed using special functions called constructors. Each
tool may have one or more types of constructors. Once a
tool has been constructed, the user can use functions of the tool to perform the various operations needed for data processing.
- Global functions
- perform single straightforward operations that
cannot be naturally grouped. Invocation of the global function is
very straightforward, involving just the arguments of the function.
As an example, the Mathematics module in the
utility package contains many tools (including,
fftserver, matrix,
polyfitter) and global
functions (including, gauss1dfitter,
mean, moments).
Global functions, tool constructors, and tool functionsperform
the actual operations associated with data processing. These
functions and constructors have various input arguments (with
sensible defaults) and optional outputs. These will be shown once you
press the Create or Run buttons.
Finally, the Tool Manager GUI contains a Search entry on the
top. This entry can be used to search for the occurrence of any
string of characters in the entire AIPS++ system.
There is one entry Search String and a
button to the right to display the results of the search. The search option
is very useful for locating the appropriate modules or functions for a
given operation for which you may only know a keyword.
- For instance, type advise in the
Search String window and press return. The results can be
seen by pressing the Search Results button.
- You get the answer synthesis.imager.imager.advise
- This implies, that advise is a function of the
tool imager which is contained in the module
imager of the
package synthesis.
- The general syntax for representing an "entity" in the
AIPS++ hierarchy is thus
- package.module.tool or
- package.module.tool.function or
- package.module.tool.constructor or
- package.module.global function
- As a further experiment, type imager for the search
string and see the various occurrence of this string displayed in the
window. Notice that the same name (e.g. imager) is used for a module,
a tool and a constructor. There is no clash in this
usage.
The concepts introduced above should become more understandable once
actually do something, so let's make an imager tool.
Tools can be constructed from the Tool Manager GUI by selecting the
tool name and then clicking the Create button. This
operation generates a view of the tool constructor with various arguments.
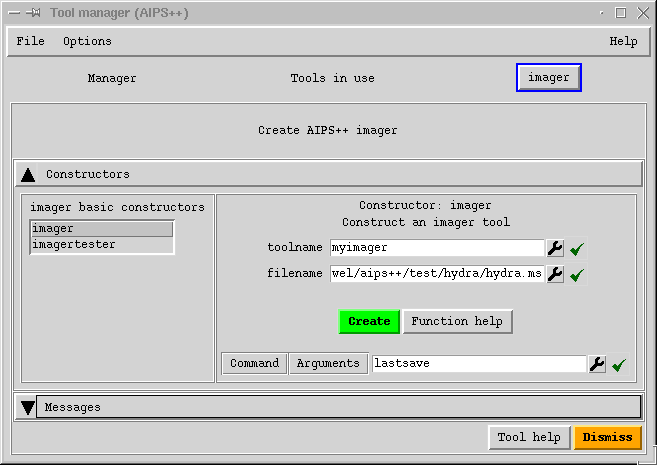
Figure 4: Tool manager view of the imager constructor
Making and using an imager tool
- Click the Manager tab on the Tool Manager GUI. Then
Select the imager tool by sequentially clicking synthesis
under package, imager under module and finally
imager under Tools.
- Click Create. A Constructor GUI appears as shown in Figure 4.
On the left hand size this GUI shows that there are two imager
constructors, called imager and imagertester.
- Click imagertester under the list of
imager constructors. The
GUI displays the inputs to this constructor. This
constructor creates a standard MeasurementSet and connects the
imager tool to it. All the default arguments will work just
fine for this demonstration. (Note that the other constructor
takes the name of a MeasurementSet and so if you have one, you
could use that constructor instead. Both constructors lead to an
imager tool that is used in exactly
the same way.)
- type in the tool name you want, by placing the cursor on that
window. (or just leave it at its default myimager)
- Press the Create button. The imager constructor then
starts to run. Afte 10-15 seconds, the view of the constructor will
disappear and it will be replaced by a view of the tool
functions (figure 5). The tabs at the tool will be updated.

Figure 5: Tool manager view of an imager tool
On the left of the view, you will see a scrollable list of the
functions of the tool. Selecting one of these functions causes the
corresponding tool function arguments to be shown on the right hand
side. Input arguments have a white background, output arguments have
a grey background and cannot be edited.
For some complicated tools, such as imager, the functions may be
grouped. The particular group may be selected using the
button labelled 'Function groups' at the top of the list of
functions. If you do not find this helpful, you may access all
functions at once using the group 'all'.
To use a specific function of the imager tool, do:
Using a tool function
- 1.
- If present, choose the required group of functions by clicking on the
'Function group' button.
- 2.
- Choose the required tool function by clicking it. This operation
gives a one line description of the tool function and a list of
various input arguments. At any point,
you may press the web button to get detailed information on
that function.
- 3.
- Enter the various input arguments. Some tool functions may have
no arguments. Short popup help on each argument is available by placing
the mouse pointer on the argument name. More detailed help can
send to your browser using the web button.
- 4.
- Click Go
Try this now for the advise tool functionfound in the
helpers function group. This tool functioncalculates maximum cell
sizes for the selected data in the associated MeasurementSet. You can
also set a field of view to get a recommended number of
pixels.

Figure 6: Tool manager view of an imager tool showing the advise function
Another good tool function to try is plotvis to plot
the visibility data.
At this point you may switch views in a number of ways:
Switching Tool Manager views
- Switch to the Manager view using the tabs. Note that
a new tab imager:myimager now appears.
Switch back to the imager tool using this option.
- Dismiss this view of imager:myimager using the
the Dismiss button. The tool still exists but this view has
been removed from the Tool Manager. The view can be recreated by
selecting the tool name myimager in the
Tools in Use view and clicking Show.
- End the use of this tool (and the view) by pressing the Done button.
This will destroy the tool altogether so that it can no
longer be used.
- Switch to the Tools in Use view using the tabs.
The Save button at the bottom of the GUI, when pressed, saves
the current inputs of the currently selected tool function to a
default Glish record named lastsave. Similarly
Restore fills in the arguments of that function from
previously saved values in lastsave. Also when the
Go button is pressed the values used for the tool function
are automatically saved into lastsave. The Glish record
lastsave is written into a file called aips++.inputs.table
in your AIPS++ directory. This AIPS++ Table can, in
principle, contain many Glish records. The inputs to a
function can be saved into a different record by changing the
name from lastsave to some other name, say, mysave1. In this case mysave1 is written as another
Glish record in the same table aips++.inputs.table
(This Table can be browsed from the File Catalog using the
View button). Same rules apply for Restore.
Note that Save and Go buttons do not save the entire
environment of AIPS++. Each action only saves the inputs of only that
tool function which is executed. Thus the saved records in
aips++.inputs.table can be of different length.
For each of the parameters of a function, the Spanner (or
Wrench) button offers the various options by which
parameters can be assigned or used.
The clipboard is just a clipboard. Any
Glish variable (A filename, an array, a string of characters, a number, a set of variables) can be
copied to the clipboard and pasted back to
the same or some other place. For instance under the button
Inputs, near the top of a tool view, the option Copy
to Clipboard will copy all the inputs of the function to the
Clipboard. They can be pasted back using
Paste option under the same button. Under the
Commands button, which is next to it, the option copy
to clipboard will copy an equivalent Glish command string to
the Clipboard. This string, when typed on the Command Line window will
execute the function just like pressing the
Go button on the GUI. This string can, for example, be copied
on to the Command Line window using
Pasting from the clipboard
x := dcb.paste()    # Set x to the value in the clipboard
eval(dcb.paste())   # Evaulate the contents of the clipboard
where eval is a very useful Glish function that evaluates the
supplied string and returns the result.
dcb is in fact a tool (defaultclipboard)
which has two functions copy and paste. It
belongs to the module tasking in the package
Utility. In principle, it is available under the
Tools in Use view, but you will hardly ever need to
use it from there.
Similarly variables can copied to the clipboard:
copied into a Glish variable by using:
Copying to the clipboard
dcb.copy(x)                   # Copy the glish variable x
dcb.copy(dm.source('3C273'))  # Copy the position of 3C273
At the right end of each entry is an indicator of the
status of the value. The states are:
- Green tick
- The value is valid. Execution can start.
- Red cross
- The value is invalid. Execution cannot start until
this value is changed.
- No entry sign
- No entry is allowed (i.e. output only field.
Each function that is executed by the Tool Manager has an equivalent
Glish command string which could be used from the Glish prompt or
in a Glish script to achieve the same result. A tool
scripter is available to record all equivalent Glish
commands for a Tool Manager interactive session. It can be enabled
using the option Write to Scripter under the
Commands button in the Tool Manager. This will start recording all
subsequent commands to the scripter
(actually the defaultscripter: see the Tools in Use view of the
Tool Manager).
scripter can save the
accumulated Glish commands to a file, in addition to other
capabilities. This file can be used as a Glish script, and can be
edited and executed. This is a good starting point for generating
customized Glish scripts. A given script can be executed from
Glish using the command include 'myscript.g'. A utility is
available to edit the script before execution as
dc.edit('myscript.g').
Next: The File Catalog GUI
Up: Getting Started in AIPS++
Previous: Running AIPS++
Contents
Please send questions or comments about AIPS++ to aips2-request@nrao.edu.
Copyright © 1995-2000 Associated Universities Inc.,
Washington, D.C.
Return to AIPS++ Home Page
2006-10-15
 News
News